Salesforce recognises how vast and vital the healthcare sector is to everyone, and has established a cloud focused on this sector to improve patient and internal user experiences.
In this blog we’ll look into what Health Cloud does and what you can gain from using it.
What is Health Cloud?
Health Cloud is built on Service Cloud, one of Salesforce’s most popular offerings. Health Cloud is a set of functionality that allows patient liaisons and healthcare professionals to monitor, segment and prioritise patient data. This cloud partnership provides the healthcare sector with improved and personalised customer service, as well as, internally, showing healthcare professionals a 360-degree holistic view of their patients. These advantages are possible through features such as smart case management functionality, EHR-to-Salesforce API connections and secure record management.
Now that we’ve covered an overview of Health Cloud, let’s define some of the key terminology!
Quick glossary:
Service Cloud: The key Salesforce Cloud that Health Cloud is built on. It enables users to create a tailored and personal customer experience, to ‘increase satisfaction, retention, and lifetime value’.Want to learn more about Service Cloud, check out Trailhead’s Service Cloud Basics module!
Smart case management: According to Salesforce:“A case management system lets a company collect and organize customer service interactions that occur on any channel.” What makes it smart? “Modern case management platforms pull customer requests into a database, where customer service agents can view and respond to them…”
EHR-to-Salesforce API connections: An add-on API Salesforce extension specifically for Health Cloud. These connections enable your Salesforce CRM to receive and translate EHR, and other sources of medical data, for patient records.
What can you build with Salesforce Health Cloud?
Salesforce Health Cloud is a set of functionality built on the Salesforce CRM platform. This means that when you’re using Health Cloud to communicate patient needs, collaborate with other healthcare professionals and track and monitor patient progress, everything is in one place!
Popular examples of things you can do with Health Cloud:
With Health Cloud, you can access the right health information about patients from a range of sources, including EHR systems and wearables. Healthcare professionals can prioritise tasks and segment patient lists, provide real-time and collaborative messaging for providers, patients, family members, and care teams. All this enables patients to receive the best and most personalised care possible.
Health Cloud is native to Salesforce, so there is no requirement to switch between solutions which can lose you time or worse, cause confusion in interpreting and working with siloed data.
Put simply, Health Cloud allows you to:
Remain on Salesforce – everything you need is in one place!
Personalise patient services
Receive and manage all medical data records and contacts in one, central and secure system
Engage with health liaison officers, patients and more using community hubs
Tailor, configure and scale your cloud as you grow
Salesforce Health Cloud and ProvenWorks in action
As a set of functionality, Health Cloud adds tremendous value to your healthcare practice by creating endless new and improved opportunities for you to interact with your patients and partner healthcare providers.
ProvenWorks offers solutions that work seamlessly in Health Cloud to:
Empower internal and external users to provide verified addresses at the point of entry
Open up import jobs to partners simply and securely
Import data into Health Cloud efficiently
Is data importing a pain point impacting your and your patients’ experience? SimpleImport enables simple and secure importing into Salesforce without losing precious time for patients or healthcare professionals.
Empower internal and external users to provide verified addresses
Managing patient information and keeping records clean with up-to-date data is essential for the healthcare industry. AddressTools ensures all address data is verified from the point of entry. AddressTools solves your address data concerns, while you focus on treating your patients.
If you’re looking to work in software, you might well have heard of Salesforce, but did you know there is a whole ecosystem of jobs around Salesforce?
We’re going to explore the opportunities available in the wider Salesforce ecosystem, focusing on Salesforce ISV partners, and the reasons why you should consider working there.
But first, perhaps it’s worth explaining a few key terms.
What is a Salesforce ISV?
ISV stands for Independent Software Vendor. An ISV is an organisation specialising in making and selling application-specific software – in this case, solutions for Salesforce.
ISV partners create apps that are unique and expand, adjust or supplement the existing functionality that Salesforce offers. You can find a whole range of apps listed on the Salesforce AppExchange.
What is the Salesforce AppExchange?
We’ve all got apps on our phones. The AppExchange is a marketplace exactly like the App or Play store but specifically for Salesforce.
What are the benefits of working at a Salesforce ISV?
So now we know what a Salesforce ISV does, why should you consider working at one? A few benefits spring to mind:
1. Remote working
The majority of ISVs you come across will offer remote / hybrid working. It’s something that Salesforce pushes heavily so it makes sense that ISVs follow suit.
2. Events
It’s likely everyone you come across in the Software / Tech industry will have heard of Salesforce but not as likely that they will know about every single ISV that exists (there are more than 5,000 apps on the AppExchange to give you some context here!). So naturally, whatever your role at an ISV, you’ll be encouraged to go to events or community-run user groups to get the company’s name out there.
🍕 I’ve not been to an event that hasn’t offered free food yet so what’s not to love!
3. The ISV community
Whilst you will find the first two benefits in most software companies, what makes ISVs unique is their collaborative nature. It’s an incredibly welcoming and friendly ecosystem. There’s even a huge Slack group exclusively for Salesforce ISV partners to share ideas, ask questions and work together! Chances are there will be opportunities for collaboration, co-hosting events, knowledge sharing, and no doubt you’ll make some great friends along the way!
Why work for an ISV?
Working for an ISV is incredibly rewarding because not only are you learning all about the Salesforce platform but you are also learning about the ins and outs of the product the ISV is selling too. One thing to bear in mind is that all ISVs are different. Like with any organisation, there are small ISVs and large ISVs. That’s why I’ve been in touch with a few people from different ISVs (who have different roles within their ISV) to get a few perspectives.
💡 Note: It’s highly likely that anyone you speak to within the Salesforce ecosystem is going to be willing to help you out. So if you want to know more about what it’s like to work at a certain ISV, why not get in touch with them to see if they can give you some insight?
Ruth Cawdron
Ruth Cawdron discovered the Salesforce ecosystem when she joined ProvenWorks, a British ISV, a year and a half ago. Switching industries after five years in the education sector, Ruth brings a keen passion for storytelling and creative collaboration to her role of Marketing Manager.
I think what’s struck me most working for a Salesforce ISV is that I have the best of both worlds. Obviously there are global ISVs out there but I’m lucky enough to work at a scale up. The size of our team means I get to wear lots of different hats and every day I see the direct impact of my contribution and decisions for the business. Equally, as a Salesforce Partner, we’re privileged to attend lots of huge (like REALLY HUGE!) events and gain access to opportunities that smaller software companies in other industries wouldn’t get. Yes, I work at a scale up, but I have potential to tap into the Salesforce’s 150,000-strong customer base and meet 200,000 trailblazers at Dreamforce!
The other thing I’d add is that there is a long term career in the Salesforce ISV industry if you want one. The skills you learn at one ISV and, equally as important, the contacts that you make, are completely transferable from one ISV to another regardless of size and industry.
Jack McCurdy
Jack is Salesforce DevOps Advocate at Gearset, guiding and educating Salesforce customers on how they can streamline delivery of their Salesforce applications. Jack spends most of his time in and building the community, with the aim of creating happier, more successful, and empowered professionals.
Working at an ISV gives you so much opportunity to understand how and why Salesforce teams do what they do. With that you can add a lot of colour, and a lot of value, to conversations across the ecosystem with the Salesforce professionals you meet who are looking to overcome the challenges that either you solve, or have spoken with others about.
We are all Salesforce end-users ourselves, or building AppExchange applications. That of course means there are roles in ISVs if building is your thing. But, if you’re looking to expand your horizons, apply your Salesforce knowledge differently, or gain exposure to how organisations work from every angle, then an ISV could be the place for you.
Are there other ways I can get involved in the Salesforce Ecosystem other than at an ISV?
Yes! There are two other main routes:
SI (System Integrator)
End Customer
Want to know more? Here’s a webinar hosted by Salesforce Ben and Hays Technology to tell you everything you need to know! (PS. I was talking on the webinar too!)
Summary
We’ve looked at what a Salesforce ISV is, and how it sells apps on the AppExchange. We’ve taken a dive into some of the key benefits of working at an ISV and heard from different people within the ISV community. Hopefully that’s given you some insight into why you might be interested in working for a Salesforce ISV!
As part of their Summer ‘22 Release, Salesforce has announced the retirement of a number of legacy APIs.
Versions 7.0 through 20.0 of the Salesforce Platform SOAP, REST, and Bulk APIs will be deprecated and no longer supported as of the Summer ’22 release.
This means that these legacy APIs, and third-party integrations that rely on them, will cease to function after the release.
When are the Legacy APIs being retired?
Salesforce announced that June 10 and 11 2022 is the final release weekend when all remaining Salesforce instances are upgraded if they haven’t been already.
Legacy API Retirements and ProvenWorks solutions
To ensure that you do not encounter any issues with AddressTools, SimpleImport, IndustryComplete or PhoneTools, we recommend ensuring that your current version is or is later than the versions listed in this post. If you need advice on how to upgrade an AppExchange managed package, please see the resources linked at the end.
We have listed the version of each tool, including a link to its latest AppExchange listing, that you must be on in order to be using supported APIs.
You might hear people talk about “Community Cloud”… You might be wondering how a Digital Experience is different to Salesforce Experience Cloud… Or you might be asking yourself where a partner portal fits into all of this…
Don’t worry, we’ve got you covered in this article!
What is Salesforce Experience Cloud?
Salesforce Experience Cloud is a set of functionality built on the Salesforce Customer Relationship Management (CRM) platform. Experience Cloud enables you to build beautifully-branded “digital experiences” that are connected to your CRM with a key focus on engaging customers and empowering partners. You can use Experience Cloud to create multiple sites and experiences within your Salesforce org to address different purposes.
We’ve already thrown in a few tricky words so why don’t we take a quick pause to define some key terms.
Quick glossary:
Salesforce CRM platform: More than a database, this powerful software is your single source of truth for managing your customer relationships. It’s for you and your business.
Salesforce Experience Cloud: Formerly known as “Community Cloud”, it’s a set of functionality to deliver external-facing digital experiences (see below) that sit on top of your CRM. It’s for you, your business and your external stakeholders.
Salesforce Community Cloud: The old name for Salesforce Experience Cloud.
Digital Experience: The external-facing ‘site’ you can build with Salesforce Experience Cloud.
Site: Another name for a Digital Experience instance.
Partner portal: One example of a Digital Experience.
Help forum: Another example of a Digital Experience.
DXP: You might see Experience Cloud referred to by this acronym; it is Salesforce’s digital experience platform (DXP).
With those definitions in mind, Salesforce’s online learning platform, Trailhead describes digital experiences and Experience Cloud:
“A digital experience built using Experience Cloud provides a window into your Salesforce world.”
So hopefully we’ve cleared up some terms and their definitions. Now let’s investigate what this means in reality!
What can you build using Experience Cloud?
Salesforce Experience Cloud is a set of functionality built on the powerful Salesforce CRM platform. This means that when you’re using Experience Cloud to build a digital experience, the world is your oyster!
You can create a digital experience for any situation where you want to present a beautiful external-facing interaction with your Salesforce CRM.
Popular examples include:
Partner portal
Account portal
Storefronts
Microsites
Industry solutions
Customer service hub
Help centres
Support site
Mobile app
💡 Top tip: Salesforce has created Lightning Bolts. These are pre-built industry-specific Digital Experience templates (amongst other things!) created to help you go to market quicker.
Why should you use Experience Cloud?
With Experience Cloud, you’re giving stakeholders what they need. Not only this, but you’re doing this completely integrated with your CRM. This means you’re maintaining and cultivating a single source of truth with an even bigger picture of your business, your customers and your partners.
We keep repeating that it’s built on the Salesforce platform… but that’s because it’s important! By building on the Salesforce platform, you’re building your partner portal or support forum on world-leading software that is scalable, secure, customizable and centralized.
A few more perks to consider at a glance:
Go to market fast with industry-specific customizable themes
Create multiple experiences for specific needs
Design for every device since all digital experiences are 100% mobile optimized and fully responsive
Partner users cannot import data to Salesforce in a digital experience
Standard Salesforce does not allow users to import data in a digital experience.
We’ve seen that Salesforce themselves describe Digital Experiences as a “window” into your Salesforce world.
However, many businesses and organisations need more than a window; they need a door.
Salesforce Digital Experiences (Communities) built on Experience Cloud have been growing in popularity. It’s easy to see why they’re so popular, since digital experiences can be used in so many contexts: partner portals, e-commerce sites, help centres and even franchisee hubs.
With so many different digital experience audiences come lots of reasons why users need to import data.
It’s worth bearing in mind that standard Salesforce does not allow digital experience users to import data.
Experience Cloud and ProvenWorks in action
In case you can’t tell, we love Salesforce Experience Cloud. As a set of functionality, it adds tremendous value to your business by creating endless new opportunities for you to interact with your stakeholders.
However we’re not just fans of Experience Cloud; as a team of Salesforce experts who create data management solutions to save you time, we see the powerful potential of Digital Experiences.
We’ve created solutions that work seamlessly on Digital Experiences to:
Open up import jobs to partners and business users simply and securely
Empower external users to provide verified addresses at the point of entry
Empower external users to import safely and simply via a digital experience
Think partner deal registrations or subsidiary sales information. Safely empower users to import data into your Salesforce through preconfigured mappings using our two-step drag and drop wizard – introducing the ManagedImport component.
Reduce cart abandonment and improve user registration with fast address verification
Think user registration portals and ecommerce checkouts. Create powerful user experiences with our Address Verification Flow Component that verifies address data at the point of entry in 5 key strokes or less.
If you, like many of us, have been eagerly awaiting the custom address field type in Salesforce (it’s only been like 10 years or so?), then you’ll be pleased to hear that Salesforce has announced it is in Beta from the Summer ‘22 release!
At ProvenWorks we’ve been fortunate enough to participate in the closed pilot since day one so we have been able to follow its progress. We’re now excited to be able to share with you some information so that you can be prepared for its release.
Isn’t the custom address field just like the standard address field type?
Sort of – however, be prepared that State & Country picklists are enforced for all new custom address fields in Salesforce, regardless of your existing org settings. This is largely why we’re writing this article.
State & Country picklists provide a neat solution for ensuring clean data at the point of entry, but admittedly, we’ll be the first people to warn you about the integration issues, customization headaches, and maintenance anxiety you may face when using Salesforce State & Country picklists.
…Nevertheless we are address experts in Salesforce so we’re going to embrace State & Country picklists head on and let you know how to prepare if you wish to migrate from custom text fields to the new address field type.
❗ Important:If you’re steering clear of State & Country picklists and you wish to remain using text fields then keep doing what you’re doing! There is no need to change if it works for you. The rest of this article may still be helpful to understand how to standardize data stored in State and Country text fields.
Standardization is critical
Keeping org data clean is the driving force behind Salesforce’s decision to enforce State & Country picklists for the new field type. If you, like many others, have been excited to migrate away from five custom text fields to a single address compound field, then we’re going to have to standardize that data before the migration process.
The rest of this article will walk you through a fast and efficient way to standardize your existing data from within Salesforce using AddressTools Premium. We’ll cover two approaches:
Create a standardization trigger leveraging AddressTools and run a “mass update” to execute the logic.
Export a standardized list of address data ready for reimporting back into Salesforce.
Both approaches require the same initial steps for configuring AddressTools’ standardization functionality so we’ll start there and break out into the two options later.
The use case
The scenario we’ll be following will be looking at a custom object called “Warehouse”. The Warehouse object contains five custom text fields that when put together create an address. We will refer to these fields collectively as an “address block”.
The five custom fields are:
Street
City
State
Postal Code
Country
The fields are populated from a number of different sources – web forms, integrations and user entries – so we cannot guarantee that the data is standardized.
To prepare this data we’re going to expedite the process by using AddressTools Premium available on the AppExchange. As users (and developers) of the package we have heaps of experience and even some hidden tricks that’ll save days. It shouldn’t take more than a couple of hours from start to finish.
Installing the AddressTools Premium trial
If you’re not already using AddressTools Premium in your organization you’ll need to first install it from the AppExchange. You can do this in a sandbox if you want to test the functionality before pushing it to production.
Note: AddressTools Premium is a paid-for product that comes with a 14-day free trial. This could save you days of work so the cost may be something worth considering, especially if you have wider address requirements.
Select Install in Production or Install in Sandbox depending on your requirements. It is best practice to test in a sandbox before moving to production.
Agree to the terms and conditions.
Select Confirm and Install.
You may be prompted to log in again. If so, log into the org you want to install the package to.
Select Install for Admins Only.
Press Install.
Check Yes, grant access to these third-party web sites.
Select Continue.
Let the process install the package. AddressTools Premium has a lot of features so it may take some time to install (you may receive a warning saying it’s taking a long time, this is normal). When the package has completed its installation you’ll receive a success email.
Once the package has been installed, navigate to the AddressTools App (via the App Launcher) and open the AddressTools Administration tab. You’ll immediately be on the Installation sub-tab.
Under the Installation tab, select Create Token.
A green tick will appear next to the first step.
Next we’ll want to install the AddressTools Premium dataset. This is a list of countries, states, alternative names, ISO codes, (and heaps of other address-related data).
Warning: This dataset is large. Ensure you have enough storage available if you’re testing this in a sandbox. If your allocated storage is low or you are unsure you can select Only install sample data but beware this will not populate any alternative country and state values that will be used to expand the acceptable standardization data for countries and states. This can be manually added later if you so wish.
Under Data Installation, select Get Started.
Optionally choose Only install sample data.
Select Install.
A final warning will appear in relation to storage size. When you’re ready press Yes.
This may take some time and will preconfigure some functionality for your org. Feel free to continue reading this guide so that when you’re done you’ll be ready to rock.
Once the installation has finished, refresh the page to see that green tick.
Disabling the out-of-the-box functionality
A trigger is provided out of the box for the Account, Contact, Contract and Lead objects. If this is a fresh installation of AddressTools Premium in your org we’ll want to disable these triggers so that we don’t impact current business processes when we begin enabling functionality further down the line.
After the data installation:
Select Settings from the left navigation.
Scroll to Trigger Settings.
Disable each of the trigger settings in this section.
Select Save.
If the address fields you want to standardize exist on one of the four objects, the triggers can be re-enabled at a later point.
Configuring the address block
As mentioned earlier we’ll be referring to the five custom text fields as an “address block”. We need to configure AddressTools Premium with each of the text fields. This will allow the tool to execute standardization on the custom State & Country fields.
On the AddressTools Administration page, select Address Blocks from the left navigation.
Use the Add button in the top right.
Select the object where your address block exists. We’re choosing Warehouse__c.
If you have record types enabled on the object, leave None chosen.
Select Next.
Under Postal Address Fields, select the relevant fields for each picklist:
Country
State
City
ZIP/Postal Code
Street
With the object and address fields now specified, it’s time to choose the settings we want to enable for the block.
Whilst still on the new address block modal:
Scroll down to Global Settings.
Check Standardize Country.
Check Standardize State.
Note: there are plenty of other settings here that may take your fancy. A tooltip is provided next to each giving you some insight into what’s available. You can come back to this page at any time should you wish to explore the other capabilities of AddressTools Premium.
We’ll complete this step by selecting Save.
Configure standardization values
Standardization is the process of converting multiple acceptable values to a single value. For example let’s take a look at the country Egypt:
Full name – Egypt
ISO-2 – EG
ISO-3– EGY
Local name (Latin characters) – Miṣr
Local name (Native characters) – مِصر
Each of the above values are technically correct entries for Egypt but a picklist won’t allow all of these values to be entered. Using a text field to accept all the variations of the country name will ease the stress for end users, integrations and streamline future expansions of your org. It’s then best practice to standardize the values to a single preferred format for analytical purposes after the data is inserted.
To identify the acceptable values for each country we’ll take a look at the Countries object installed with AddressTools. This is one of the objects that the data installation will have populated records for and is fundamental to the standardization functionality.
Select App Launcher.
Search and select Countries.
Select All from the available list views.
To help understand the data, select the United States country record from the list view.
Looking at the Country record, you can find dedicated fields for:
Full name
ISO-2
ISO-3
Local name (Latin characters)
Local name (Native characters)
The good news is that each of these field’s values are automatically configured to be accepted in text fields configured with AddressTools Premium. When the AddressTools trigger functionality is enabled the values will be standardized to a defined format on insert and update.
Let’s take a look at another example for acceptable data by talking about United Kingdom, or do I mean Great Britain, or England?… You get where I’m going…
State & Country picklists don’t support the inputs of these variations, and these variations also don’t fit into the five dedicated fields on the Countries object. This is where we introduce Alternative Country Names.
Whilst still looking at your existing country record, select Related.
Select Alternative Country Names.
This list may be empty depending on the country you’re looking at or because you only installed the sample dataset. Don’t worry, you can add as many records here as you find necessary.
To add a new Alternative Country Name:
Select New.
Write the value into the Alternative Country Name field.
Ensure the Original Country field is populated with the Country.
Is Obsolete: Unchecked.
Select Save.
And it’s that simple, you’ve now added an Alternative Country Name that AddressTools will be able to identify during the standardization process.
The State object is configured similarly. To access States navigate to the related list on the Country record. For example, navigate to the United States Country record, select Related, and here you’ll find a list of states belonging to the United States.
Each State record has a:
Full name
ISO code
An Alternative State Name object is available where you can add a list of acceptable values. After all, we can’t seriously expect all our users to spell Mississippi correctly every time… So practically speaking if there are common misspellings or abbreviations you find in your org you can add them here to be standardized.
That covers configuring all of the acceptable values. Now we need to define the formats for the data to be standardized to.
Defining the standardized formats
Whilst we’re still looking at Country and State record data, we’ll configure the State format first.
This is managed on the Country record and can be controlled on a per-country basis.
Navigate back to a Country record (i.e. United States).
Enable or disable Use Subcountry Code in State field.
This option can be enabled/disabled to standardize the state value to either its full name or ISO value (i.e. Texas vs TX).
Lastly, we need to define the Country format. This is an org-wide setting and applies to all country values.
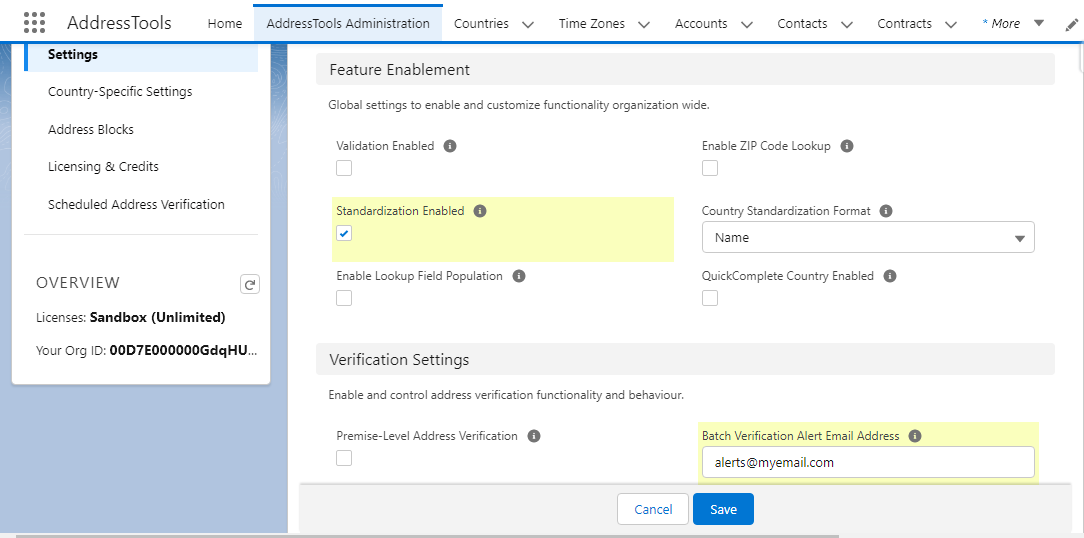
Go to the AddressTools Administration tab.
Navigate to Settings in the left navigation.
Use the pencil icon next to Standardization Enabled.
Check Standardization Enabled.
Edit the Country Standardization Format to match the desired format.
Select Save.
Note: These settings can be changed at a later date if you need to change your format. You’ll then need to run one of the following jobs to standardize the data to the new format.
It’s configured, now what?
We have two options to mass standardize the data:
Enable a trigger on the object, run a mass update and have the trigger standardize all the data during the update.
Invoke a job via the Developer Console to export a standardized list of data that can be manually reimported into Salesforce.
Choose the approach that best suits you. If you’re unsure what route to take we have instructions below walking you through both.
Option 1: Create a trigger on the object and run a mass update.
We’ve configured all the standardization settings so now we need to tell the object to follow them. As we’re working with a custom object in this example we’ll need to create a new trigger in the org to invoke the AddressTools functionality.
A trigger is provided out of the box for the Account, Contact, Contract and Lead objects. Follow the relevant steps to enable or create a trigger for the object where your address block exists.
If you’re working with either of the Account, Contact, Contract or Lead objects:
Navigate to the AddressTools Administrator tab.
Select Settings from the left navigation.
Scroll to Trigger Settings.
Enable the trigger on the object you’re standardizing.
Select Save.
If you’re working with an object that isn’t Account, Contact, Contract or Lead:
Go to Setup.
Navigate to Object Manager.
Locate the Object you want to create the trigger for.
Select Triggers and New.
In the box, replace the existing code snippet with the following:
trigger ValidateOBJECTLABELCountryFields on OBJECTAPI (before insert, before update) {
    pw_ccpro.CountryValidator2.Validate(Trigger.new, Trigger.oldMap);
}
Replace OBJECTLABEL with the label name of the object you’re creating the trigger for.
Replace OBJECTAPI with the API name of the object you’re creating the trigger for.
Select Save.
With the trigger enabled for the object, we need to turn on the standardization setting in the AddressTools Administration tab:
Navigate to the AddressTools Administrator tab.
Select Settings from the left navigation.
Under Feature Enablement, check the box for Standardization Enabled.
Confirm that the Country Standardization Format is set as you desire.
Select Save.
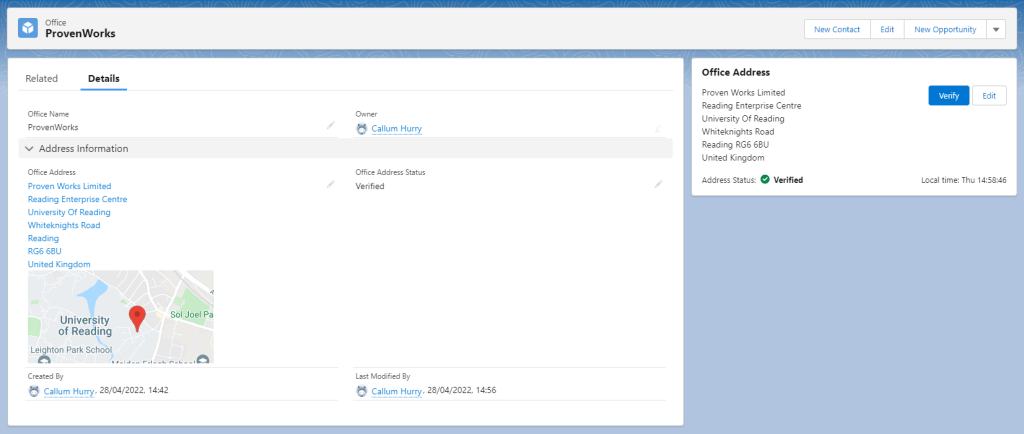
Before we do a mass update we can test the standardization functionality on our address block.
Navigate to a record where your address block exists.
Edit the record.
Change the country text value to a variation of the value currently present (e.g. if the country is United States, change it to USA or US).
Save the record.
The record will standardize to the format specified in the settings. (If you entered the desired format, the value won’t change on save as it’s already in the expected format. Try changing to another format to confirm the test).
Before save:
After save:
Now the test has been confirmed we need to invoke the trigger on all existing records. This will involve running an update on every record in the object. There are many different ways that you can achieve this so if you can already think of one then do what you know best.
If you need some guidance, we have a separate article on how to run a “mass touch” using Salesforce Flows. Check it out here.
Once the mass touch operation has successfully run, all State and Country values that matched the AddressTools dataset will now adhere to your defined standardization format.
There may be some leftover values and this will require some manual intervention. If you find a repeat offender you can add the value to the Alternative Country or State Name objects and re-run the process to catch them.
Option 2: Export the standardized data for importing later
Before we start, it makes sense to see the result of these instructions so let’s take a look at what our exported file will contain.
For every record on the configured object that can be standardized, the data will be exported with the following data in the file:
Record ID
Current text field values (Old)
Standardized versions of the text field values (New).
Note: The export will ignore records that are already in the desired format or that contain data that cannot be standardized (i.e. an unrecognized value).
To prepare AddressTools Premium to execute this export:
Navigate to the AddressTools Administrator tab.
Select Settings from the left navigation.
Under Feature Enablement, check the box for Standardization Enabled.
Confirm that the Country Standardization Format is set as you desire.
Add your email address to the Batch Verification Alerts Email Address field.
Select Save.
This process will need permission to send an email to the email address configured in the previous section. You may need to change your org’s Email Deliverability settings to support this.
To check/change your Deliverability settings:
Go to Salesforce Setup.
Search for Deliverability in the left search.
Select Deliverability from the left navigation.
Make note of your existing Access level, you can revert the setting back to this once you’re done.
Change Access Level to All email.
Select Save.
For some of you reading this guide, you may not have worked with the Developer Console before so follow closely and let’s execute some Apex!
Note: If this is your first time we recommend doing this in a sandbox so you don’t affect any production data.
Go to the cog in the top right of your Salesforce page.
Select Developer Console.
The Developer Console window will open in a new window.
Select Debug | Open Execute Anonymous Window.
Under Enter Apex Code, type the code below
pw_ccpro.BatchValidateAndGenerateCSV M = new pw_ccpro.BatchValidateAndGenerateCSV('OBJECTAPI');
Database.executeBatch(M);
Change OBJECTAPI to the API Name of your Object. We’ll be typing ‘Warehouse__c’.
Select Execute.
This will now begin the standardization process. The length of time it will take to execute will vary depending on how much data you have in your org.
Once the job is complete you will receive an email with a .csv attachment containing all of the standardized data from the address block ready for importing either into the existing fields or ready to migrate into your State & Country picklists.
And there you have it – your standardized file is waiting for you! When you’re ready to import this data back into Salesforce, use an importing tool* of your choice and ensure to update the records matching the Record ID found in column A.
Warning: Be vigilant when running mass update operations in a production environment. Where possible backup your data first.
*Pssst if you’re looking for a new favorite importing solution, why not try out SimpleImport for this import job!
Summary
So there you have it, we’ve walked through how to standardize your existing data ready for the new custom address field type in Salesforce using AddressTools Premium.
If you have found this guide to be helpful, please ensure you share it with others so that they can learn how to standardize their address data stored in text fields. If it has saved you time then it may save them time too!
If you have any questions about AddressTools and any of its capabilities we’d love to hear from you. Get in contact with us at info@provenworks.com.
Reducing manual data entry results in better user adoption, less friction for prospects and overall a better user experience.
In this example we are going to create a Salesforce flow that will fetch the State value from an entered US ZIP Code and populate the address’ state field. This removes the (often neglected!) requirement for end users to enter a State value at point of record entry. The ZIP Code data is part of AddressTools Premium which is available on the AppExchange.
Follow along with our step-by-step guide by installing a free two-week free trial of AddressTools Premium.
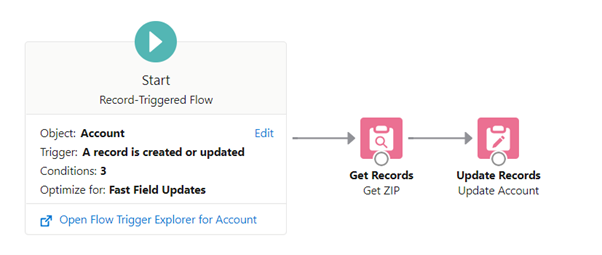
Create a flow to automate State population
Go to Salesforce Setup | Flow.
Select New Flow.
Choose Record-Triggered Flow.
Search and select the object that you are configuring the process for.
Set Trigger the Flow When to A record is created or updated.
Select Done.
Set entry conditions.
Condition requirements All Conditions Are Met (AND)
pw_ccpro__BillingCountryLookup__cEquals United States
BillingState Is Null TRUE
BillingPostalCode Is Null FALSE
When to Run the Flow for Updated Records Every time a record is updated and meets the condition requirements
Optimize the Flow For Fast Field Updates
The flow will now be ready to start adding elements to.
Select Get Records and drag it under the Start element
Label Get ZIP
Object ZIP Code
Set entry conditions.
Condition requirements All Conditions Are Met (AND)
Name Equals {!$Record.BillingPostalCode}
How Many Records to Store Only the first record
How to Store Record DataAutomatically store all fields
Add another element.
Select Update Records and drag it under the Get Records element
Label Update Account
How to Find Records to Update and Set Their Values Use the account record that triggered the flow
Set Filter Conditions None-Always Update Record
Set Field Values for the Account Record.
BillingState {!Get_ZIP.pw_ccpro__State__r.Name}
Make sure the elements are connected and Activate your flow.
Following Salesforce’s announcement that they will be retiring Workflow Rules and Process Builder, it’s clear that Flows are the future and the future is here to stay.
With that in mind, we are so excited to introduce our Address Verification Flow Component, now available on the AppExchange! Verify addresses in a flow using global postal authority data for over 240 countries.
Why should you verify addresses?
Did you know that verifying addresses up-front can reduce failed delivery rates by up to 70%? Improve customer experience and save wasted costs with verified addresses.
We’ve designed the Address Verification Flow Component to make it as easy as possible for Administrators to ‘hot-swap’ the vanilla Address component with our own component followed by a quick re-binding of any set flow variables.
So it’s easy to set up. How about some facts and figures too?
Create an exceptional user experience by reducing data entry time by 78% and errors by 20%.
Unlike Google, access global postal authority data such as Royal Mail, USPS, Canada Post for truly verified data, reducing failed delivery rates by up to 70%.
Autopopulate any address fields in 5 keystrokes or less.
The use cases
Digital Experience – Do you use an ecommerce checkout or a user registration portal? Verify addresses at the point of entry!
Internal Flow – Capture user addresses quick with type-ahead verified data. Perfect for Service Cloud users!
Endless possibilities – Wrap our solution in a custom Aura component for total flexibility!
Try out the Address Verification Flow Component
Why not start off with a free trial of the component?
Drag and drop the component into your Flows and you’re ready to flow!
If you get stuck or have any questions, feel free to contact our Support team who are more than happy to help you: support@provenworks.com.
Interested? Chat to us
The Address Verification Flow Component is an extension of our popular solution AddressTools. Pricing of the Address Verification Flow Component depends on your use case. Get in touch with us to discuss your requirements and we’ll get you the most accurate information!
As of February 2022, US companies must adhere to imposed restrictions on economic relations with the non-government controlled areas of the Donetsk and Luhansk oblasts in eastern Ukraine. AddressTools Premium customers can quickly and automatically identify Leads, Accounts and Opportunities in Salesforce that should be flagged in relation to the executive order.
The AddressTools ‘State’ object is pre-populated with Ukrainian province (oblast) values. The package ensures that all addresses in these regions use a standard state value for reporting purposes.
A custom checkbox field can be added to the State object to flag “Sanctioned Regions”. Using the package’s built-in trigger, a formula field can be populated on records in these regions. Any new record created in these regions would be automatically flagged.
Before getting started
This guide assumes that you are leveraging the Lookup Field Population functionality available in AddressTools Premium. To find out about the Lookup Field Population functionality please refer to the relevant section in the Installation Walkthrough.
These instructions will demonstrate displaying whether the Account Billing Address exists within a sanctioned region. The steps can be replicated across any address block configured with AddressTools.
When you’re ready to proceed, continue through the guide using the steps below.
Step by step guide
Create a Sanctioned Region checkbox on the State object
First create a checkbox field on the AddressTools State object and name it Sanctioned Region. This field will be used to flag regions under sanction.
Add this field to the State object’s page layout in order to maintain the value with ease.
With the field created, relevant regions can be set to TRUE by navigating to the State record via the parent Country in Salesforce. For example, navigate to Countries then select Ukraine. Finally click Related and find the impacted state in the list.
Create a formula field to display the Sanctioned Region value on an Account
To display the Sanctioned Region value on a record where the address exists, we’ll use a formula field to reference the associated State record.
Create a Formula field on the object where the address exists. We’ll choose Account for this example. When choosing the Formula Return Type, choose Checkbox and name the field Sanctioned Region.
Use the Advanced Formula tool to insert the custom Sanctioned Region field located on the related State object (this is where the Lookup Field Population functionality comes in).
Save the field and optionally add it to your page layout for quick referencing.
Save and test
When we save a new Account, the Billing State Lookup field populates on save using AddressTools’ Lookup Field Population functionality. When viewing the saved record the formula field will traverse the lookup and present the Sanctioned Region value on the Account.
Get in touch
If you have any questions or concerns about handling sanctioned states in your Salesforce org, please don’t hesitate to get in touch with us.
We’re excited to announce that PhoneTools 2.0 (Spring ‘22 Release) has arrived!
PhoneTools lets you screen your numbers against the TPS and CTPS databases, keeping you compliant with UK data privacy laws – all within Salesforce! With the much-anticipated addition of flow functionality and brand new support documentation, let’s take a closer look.
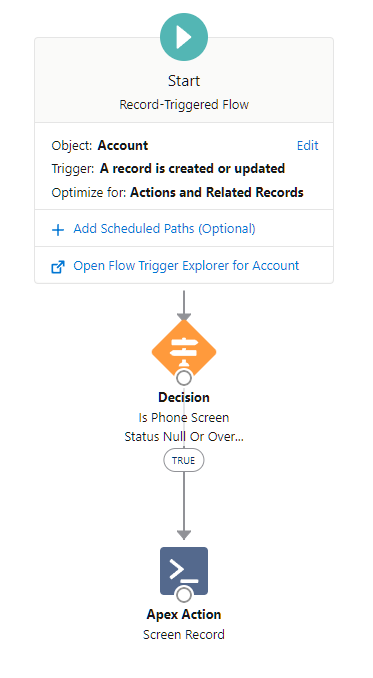
Screen your numbers in a Salesforce flow
Let’s quickly recap PhoneTools so far. PhoneTools already allows you to schedule automated nightly record screening, specifically records that have not yet been screened or have their Next Screen Due Date in the past.
Whilst practical, this leaves a window of time after the record is inserted/updated where the numbers won’t be screened until the next nightly batch job or manual user interaction.
That’s where flows come in to fill the gap.
PhoneTools 2.0 can be used within the powerful process automation tool that is Salesforce flow. What does this look like in practice? This means that you can now queue an immediate TPS and CTPS screening job to get the numbers’ screening statuses in seconds*!
With the flow, PhoneTools will queue a screening job automatically so there’s no need to wait for a nightly screening job. Equally important, is that you no longer need to rely on the user to manually click ‘Screen Phone Numbers’. Crucially, this means you can remove responsibility from your users and automate the process… what a business win!
How can you use your flow? Our best practice recommendation is to queue your screening jobs on insert and update to make sure your org has a shorter period of time holding data without a valid screening status. The outcome? Streamline your sales team’s operations and let them focus on what they do best, selling!
Does this replace my existing method of screening numbers?
This flow functionality is designed to be an additional method to screen numbers on top of what you already have configured. The nightly batch job is key for picking up those records when they’re overdue and the ‘Screen Phone Numbers’ button is helpful for re-opening old prospects. The flow functionality is designed to minimize the gap between inserting new data and providing a status as soon as possible without user interaction.
By the end of the guide, you’ll have your own flow configured and ready to screen those inserted and updated numbers. With the flow, you’re good to go!
“AddressTools solved our use case of standardizing our account data for current and future accounts in our organization.”
Alexis Johnson, Sales Operations Analyst at Comscore
Comscore is a trusted partner for planning, transacting, and evaluating media across platforms. With vast audience insights that combine digital, linear TV, over-the-top (OTT) and theatrical viewership, they combine reliable third-party measurement with transformative data science to provide insight into multi-screen behavior and help businesses grow.
An interview with Alexis Johnson, Sales Operations Analyst at Comscore
Alexis Johnson explains Comscore’s need for standardized addresses in Salesforce, and how AddressTools gave them the native easy-to-learn solution they were looking for.
What specific challenges were you trying to solve that made you look for a solution?
We were seeking an address standardization service for our Salesforce organization that would:
standardize addresses for existing and future account data.
meet this requirement for a third-party integration within our Salesforce org.
fulfill our overall need for data integrity and completion.
How was your search for a solution?
There were other vendors that were considered, however AddressTools offered a great package that met all of our needs. It offered the perfect solution to standardize our addresses, and to help align our data to meet the requirements needed for the third party integration.
How easy is it to use AddressTools?
It was extremely easy to install the application into our org and configure the settings. Our Account Manager was very helpful in ensuring a successful installation, and setting up the package settings to meet our requirements and needs.
How long did it take to train your users?
We did not roll out a formal training, but for our internal teams, it took about an hour to explain the configuration on the backend.
How does AddressTools solve the problems you had with your process?
AddressTools solved our use case of standardizing our account data for current and future accounts in our organization.
What is your experience working with the ProvenWorks Support team?
Excellent; the Support team was extremely communicative and helped with any questions or concerns that we had whilst implementing AddressTools.
Why AddressTools?
It is a great address standardization service, is extremely easy to install and configure in Salesforce, and they provide excellent customer service. Would definitely recommend!
Find out more about Comscore
Discover more about Comscore and the first-class services they provide.
AddressTools
Validate, standardize and verify your address data with our award-winning solution. Learn more and book a demo.
Do you want to learn more about how AddressTools could be a great addition to your Salesforce org? We’d love to chat! Use the scheduler to book a free call with our team and start your journey to cleaner address data.
Can’t find a time that works for you or would rather email first? Fill out our contact form and we’ll get back to you as soon as we can.