When you access SimpleImport for the first time you will be taken to the home page. This is where all uploaded files can be seen and monitored.
Files are represented as individual tiles that contain relevant information. This could be the next best action, or if an import job has been completed, a summary of the results. We will cover the different file states in a later article.
Uploading a file
Did you know SimpleImport supports uploading CSV, XLSX, XLS, ODS and more?
To get started Drag & drop your spreadsheet file into the dotted placeholder, or select Click to upload to choose a file from your computer to upload.
The file will begin to upload and generate a new file tile. It is important to stay on the SimpleImport home page whilst the file upload is in progress.
You will know when the file upload has been completed when one of the two next best actions will be visible:
Choose a sheet – if the file uploaded contains multiple sheets you will be prompted to choose a sheet. Select Choose a sheet then select the sheet you want to process. You will be pushed to the next best action once a sheet has been selected.
Import to Salesforce – if the file uploaded only contains a single sheet, SimpleImport will prepare the sheet for processing.
With the tile now in one of the two above states, move onto the next article to continue on your journey.
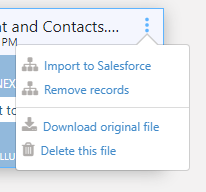
To keep everything in one place, SimpleImport uses the home screen to display all uploaded files and their states. Each file state offers actions which are accessible by clicking the three vertical dots.
‘Next best action’ states
In some file states, SimpleImport will use the tile space to suggest the next best action to ensure quick navigation through common processes.
Choose a sheet – the file you uploaded contains multiple sheets. You must now choose the sheet you want to work with.
Available actions: Choose a sheet, Download original file, Delete this file.
Import to Salesforce – the uploaded file contains a single sheet or you have selected a sheet from a multi-sheet file. You must choose one of the available actions to move forward with the file.
Available actions: Import to Salesforce, Remove records*, Download original file, Delete this file.
*Only visible if Delete records preference is enabled.
‘Summary’ states
When there is information related to the file that needs to be presented to the user, it will be shown in the following states.
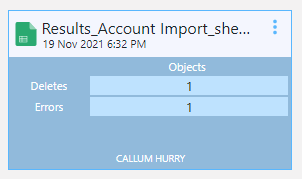
Import results – when your file has finished an importing job, a matrix will appear. Depending on the import job, a count for the number of records inserted, updated and any errors will be displayed.
Available actions: Download success file (inserts)*, Download success file (updates)**, Download error file, Undo***, Download original file, Delete this file.
*Only visible if the job has successful inserts.
**Only visible if the job has successful updates.
***Only visible if the job has success inserts or updates. Is available for 7 days after the import.
Undo results – after an undo job has processed, the matrix will update confirming the amount of records that have been undone. An error count will accumulate if there were any records that could not be reverted.
Available actions: Download success file, Download error file, Download original file, Delete this file.
Delete results – shows the quantity of records that have been successfully deleted and a quantity or rows that failed to be removed.
Available actions: Download success file, Download error file, Download original file, Delete this file.
File error – on some occasions a file may throw an error in the application. For example if the file is password protected or corrupt. The tile will present the error and turn red. If the message is truncated, you can hover the mouse over the tile to reveal the full message. If you continue to see red tiles after investigating the errors you can contact support@provenworks.com for assistance.
Available actions: Delete this file.
‘Processing’ states
A processing state is indicated when you see the spinner on a tile. A note of the process that is happening at that moment in time is displayed and for some instances, i.e. record import, a progress bar is shown at the bottom of the tile.
Configuring import settings (Campaigns and Assignment Rules).
After uploading a file into SimpleImport use the Import to Salesforce action to navigate to the object selection and import settings page.
Choosing an object to import data into
You have the option to import into a single object or two related objects. This article will cover importing to a single object so we’ll be choosing an object from the Master select list.
Note: the master object selection is mandatory however the detail is not and should only be used when doing a related import, i.e. Accounts and Contacts.
Use the Master select list to choose the object you want to import data to.
Loading an existing mapping
Before reading further, what is a “mapping” in SimpleImport?
Mappings contain a predefined configuration to complete a repeat import task. They are designed by users in your organization and specific to your usage.
It is important to note that you may not have any saved mappings if this is your first time using SimpleImport in which case you can skip this step however we will cover how to save a mapping later in this guide if you are looking to repeat your import task, or configure ManagedImport. Your system administrator may advise you on a mapping to select.
If you are aware of an existing mapping to load:
Ensure the Object selection contains the object that has the mapping associated with it.
Use the Load mapping select list to search for the mapping name.
Select the mapping.
When the mapping has successfully loaded, the path will update at the top of the screen. You can now review the configuration and navigate straight to the import summary to start the job.
Import settings
SimpleImport comes bundled with some helpful import settings that are specific to certain objects in Salesforce. These settings are not mandatory and can be left disabled if you do not wish to use them.
Import to Campaign
If your object selection contains Contacts or Leads, you can associate them with an active Campaign by using the Import to Campaign setting. A Campain Member record will be created for each Contact or Lead. Each Campaign Member will require a status value that can be defined in the import settings.
Note: This setting will be disabled if object selection doesn’t contain a supported object.
To use Import to Campaign:
Select Import to Campaign.
Search and select an existing active Campaign from the select list.
If you choose Specific status, use the select list and choose a pre-existing status value. This sets the same status value for each of the file’s rows.
If you choose Status from spreadsheet column, ensure there is a column in your spreadsheet and select its header. This option allows for a different status value for each of the file’s rows.
Use assignment rules
If your object section contains Cases or Leads, you can assign the owner by following the configured Assignment Rules in Salesforce.
To use assignment rules with your import:
Select Use assignment rules.
If you wish to follow the active assignment rule from Salesforce, select Use active rule.
If you wish to use an alternative assignment rule, select its label.
Summary
You should now be able to choose which objects you’d like to import to, load an existing mapping if one exists, and understand how to use Import to Campaign and Assignment Rules.
To continue on to choosing the import type (insert, update, upsert), select Next and move on to the next article in the guide.
What is the difference between insert, update and upsert.
Choosing an import type.
Using matching conditions with updates and upserts.
What is the difference between insert, update and upsert?
When importing data into Salesforce it is important to understand the difference between the three import types.
Insert – Only create new records in your Salesforce Org.
Update – Only update existing records in your Salesforce Org. This is only possible where a single match to an existing Salesforce record is achieved.
Upsert – Where a match can be found (see Update above) perform an update, if no match then create a new record.
For update and upsert, SimpleImport introduces matching conditions to define logic for matching existing records. This will become available for use when using update or upsert and is covered in more detail later in this article.
Choosing an import type (single object)
You’ve chosen your object, you’re now ready to define what type of import you want to complete.
Select insert, update or upsert under Import Type.
If you have selected insert, press Next to continue.
If you have chosen update or upsert, continue reading Using matching conditions.
Using matching conditions
Updating and upserting into Salesforce couldn’t be easier with the quick-to-adopt matching conditions functionality in SimpleImport. For each object that has the import type set to update or upsert, use the matching conditions tool to define criteria to find existing records in your org. This can range from simply matching existing records by their Salesforce Record ID, or a combination of fields such as Last Name, Phone Number and Email Address.
When update or upsert is chosen, the matching conditions section will automatically create one row ready to complete. Let’s get started.
Under File Column, choose a column header from the file that contains the data you want to use for matching.
Under Salesforce Field, choose the field label that contains the data you want to match with.
To add more matching conditions, select Add Row and repeat the two steps above for each added row.
Note: the matching conditions query builder will create an AND query to find existing records. It must result in finding a single record.
Summary
With the import type chosen and matching conditions set, it’s time to move on to the field mapping. Continue to the next article.
After uploading a file into SimpleImport use the Import to Salesforce action to navigate to the object selection and import settings page.
Choosing related objects to import data into
You have the option to import into a single object or two related objects. This article will cover importing in to two related objects (i.e. Account and Contacts) so we’ll be choosing an object from the Master and then the Detail select list.
Use the Master select list to choose the object you want to import data to.
Choose a related Detail object.
Loading an existing mapping
Before reading further, what is a “mapping” in SimpleImport?
Mappings contain a predefined configuration to complete a repeat import task. They are designed by users in your organization and specific to your usage.
It is important to note that you may not have any saved mappings if this is your first time using SimpleImport in which case you can skip this step however we will cover how to save a mapping later in this guide if you are looking to repeat your import task, or configure ManagedImport. Your system administrator may advise you on a mapping to select.
If you are aware of an existing mapping to load:
Ensure the Object selection contains the objects that have a mapping associated with them.
Use the Load mapping select list to search for the mapping name.
Select the mapping.
When the mapping has successfully loaded, the path will update at the top of the screen. You can now review the configuration and navigate straight to the import summary to start the job.
Import settings
SimpleImport comes bundled with some helpful import settings that are specific to certain objects in Salesforce. These settings are not mandatory and can be left disabled if you do not wish to use them.
Import to Campaign
If your object selection contains Contacts or Leads in either the master or detail selection, you can associate them with an active Campaign by using the Import to Campaign setting. A Campaign Member record will be created for each Contact or Lead imported. Each Campaign Member will require a status value that can be defined in the import settings.
Note: This setting will be disabled if object selection doesn’t contain a supported object.
To use Import to Campaign:
Select Import to Campaign.
Search and select an existing active Campaign from the select list.
If you choose Specific status, use the select list and choose a pre-existing status value. This sets the same status value for each of the file’s rows.
If you choose Status from spreadsheet column, ensure there is a column in your spreadsheet and select its header. This option allows for a different status value for each of the file’s rows.
Use assignment rules
If your object section contains Cases or Leads in either the master or detail selection, you can assign the owner by following the configured Assignment Rules in Salesforce.
To use assignment rules with your import:
Select Use assignment rules.
If you wish to follow the active assignment rule from Salesforce, select Use active rule.
If you wish to use an alternative assignment rule, select its label.
Note: if the master and detail object selection both support assignment rules, two assignment rule options will be available labelled Master and Detail.
Summary
You should now be able to choose which objects you’d like to import to, load an existing mapping if one exists, and understand how to use Import to Campaign and Assignment Rules.
To continue on to choosing the import type (insert, update, upsert), select Next and move on to the next article in the guide.
What is the difference between insert, update and upsert.
Choosing an import type.
Using matching conditions with updates and upserts.
What is the difference between insert, update and upsert?
When importing data into Salesforce it is important to understand the difference between the three import types.
Insert – Only create new records in your Salesforce Org.
Update – Only update existing records in your Salesforce Org. This is only possible where a single match to an existing Salesforce record is achieved.
Upsert – Where a match can be found (see Update above) perform an update, if no match then create a new record.
For update and upsert, SimpleImport introduces matching conditions to define logic for matching existing records. This will become available for use when using update or upsert and is covered in more detail later in this article.
Choosing an import type (master-detail)
You’ve chosen your two related objects, it’s now time to choose the import types for each object.
Note: using update or upsert on a detail object import is considered an advanced import and should only be used if you’re confident in understanding the outcome.
When working with two objects, Step 1 and Step 2 will be presented in the UI.
Under Step 1, select insert, update or upsert under Import Type.
Select Step 2.
Select insert, update or upsert under Import Type.
If you have selected insert for both objects, press Next to continue.
If you have chosen update or upsert for either object, continue reading Using matching conditions.
Using matching conditions
Updating and upserting into Salesforce couldn’t be easier with the quick-to-adopt matching conditions functionality in SimpleImport. For each object that has the import type set to update or upsert, use the matching conditions tool to define criteria to find existing records in your org. This can range from simply matching existing records by their Salesforce Record ID, or a combination of fields such as Last Name, Phone Number and Email Address.
When update or upsert is chosen, the matching conditions section will automatically create one row ready to complete. Let’s get started.
Under File Column, choose a column header from the file that contains the data you want to use for matching.
Under Salesforce Field, choose the field label that contains the data you want to match with.
To add more matching conditions, select Add Row and repeat the two steps above for each added row.
Repeat these steps for both objects until all objects configured for an update or upsert have valid matching conditions.
Note: the matching conditions query builder will create an AND query to find existing records. It must result in finding a single record.
Summary
With the import type chosen and matching conditions set, it’s time to move on to the field mapping. Continue to the next article.
Welcome to the SimpleImport User Guide. SimpleImport is a quick-to-adopt importing solution for Salesforce CRM aimed at streamlining repeat import tasks, designed to scale with your business, and offering unique functionality designed with the end user in mind.
Deploy SimpleImport and Managed Import to users in your organization
Getting this far means that we’re ready to start importing, but before we submit the job for processing, let’s take a look at the summary page.
The summary page contains:
Your selections – the file name you’re working with and the objects you’re importing into.
Matching – if the import is an update or upsert, a description of the matching conditions.
Mapping – a summary of the amount of fields mapped.
Job estimation – an estimate for how many records will be inserted or updated.
Save mapping – manage storing the mapping for reuse.
This is the last chance to review your configuration before hitting Submit. If you need to make any changes, use the Back button in the footer of the app to navigate to your desired page.
Save the current mapping
SimpleImport is designed to streamline repeat imports, whether it be through the SimpleImport application, or by using ManagedImport. Either approach relies on a saved mapping.
You have the option to save a mapping once you reach the summary page.
If you loaded an existing mapping and made some changes that you want to keep, use the Save button to update the existing mapping.
To save a new mapping, use the Save As button and provide a name when prompted.
If you are working with a multi-sheet workbook and planning to use the mapping with ManagedImport, tick Store the current sheet name in mapping for use with ManagedImport.
If this setting is left unchecked, ManagedImport will always select the first sheet in the workbook.
If the user exports a sheet as a .CSV from the workbook, ManagedImport will check the mapping automatically to see if it is a match before attempting to import. This is because sheet names are not supported in .CSVs.
Go, go, go!
Everything has been covered for configuring an import and you’re ready to go. When you’re happy, press Submit.
You will be navigated back to the Home and Upload screen where you can monitor the file’s progress and results once the job has been completed by viewing the tile’s state. You can refer back to the file states and actions article for more information.
The destination object has been selected and the import type has been defined. We’re now ready to tell SimpleImport where we want the file’s data to be imported into.
Mapping file columns to Salesforce fields
This example will cover inserting accounts from the template file shown below. It contains three accounts shown in rows 2, 3 and 4 and has column headings shown in row 1.
The mapping page contains some key features:
File columns – populated with the row 1 data from the file.
Sample data – displays the first 5 rows of data from the file. Use the left and right arrows next to sample data to scroll through the rows.
Object fields – a place to select the Salesforce fields from the object you’re importing into. Clicking each row reveals the field finder.
Add Constant – generate a new row to add a constant value to each record and map it to a Salesforce field.
Using the Field finder
The key objective on the mapping page is to associate each of the file columns that need importing with a Salesforce field. Select Map to Salesforce in the Object fields section to access the field finder for each row.
The field finder lists all fields that exist on the object you’re importing to and provides a search box to quickly locate the fields you want to map your import to.
Each field will be presented in the following format:
Field Name | External ID Field | Object Name | Required
Field Name provides the name of the field. This may be the field name, API name, or both depending on your configured preferences.
External Id Field will be displayed if the field type is a lookup field. This allows you to populate lookup fields with any supported external ID specified on field selection’s destination object.
Object Name will always display and is beneficial when importing into multiple objects. An M or D will follow in brackets highlighting whether the field is part of the master or the detail.
Required will be displayed if the field is required.
To map file columns to Salesforce fields:
Press Map to Salesforce for the row you’d like to map.
Use the Field finder search to filter the list of fields.
Select the field from the list. The field list is scrollable if there is a long list of fields.
Repeat for each file column you want to import.
To change an existing field mapping or remove an exiting field:
Press the existing mapped field for the row you’d like to edit.
Use the Field finder search to filter the list of fields.
If you’d like to remove the map, select --Click to Unmap-- found at the top on the list.
Select the desired item from the list.
Adding constant values to the mapping
Constant values allow you to import a consistent data value into a Salesforce field for each record being imported. A common use case is importing new products and making them all active, or inserting new accounts and setting the billing country to a set location.
To add a constant value:
Select Add Constant to generate a new constant row.
Type the value into the new text field. The new text field will be appended to the list of file columns.
Press Map to Salesforce in the constant’s row.
Use the Field finder search to filter the list of fields.
Select the field from the list.
To delete a constant value:
Select the more actions in the constant value’s row (down arrow).
Select Delete.
Summary
You should now be confident in understanding how to map your spreadsheet file to Salesforce fields and optionally add constant values to the mapping. This covers all of the configuration required to import into Salesforce. We’ll now head to the summary page to review the import before submitting the job. Move onto the next article to continue.
PowerSearch functionality by default will search in over 245 countries up to the premise-level. Whilst powerful, this can lead to the results being diluted, especially if you know you are only working within specific countries, or have one country that you primarily work within.
To combat this, AddressTools has three settings to improve the results and customize them to your requirements.
Available Countries in PowerSearch – PowerSearch address verification will only return address results from the listed countries. All available countries will be searched if this setting is left empty. You have the ability to choose up to 80 countries.
Priority Country in PowerSearch – PowerSearch address verification will prioritize displaying results from this country.
Show Country Filter in PowerSearch – Provides a filter list to the left of the PowerSearch search bar, allowing the user to limit the search to a specific country. This can be used in combination with Available Countries in PowerSearch to provide a limited list of countries that the user can choose from.
To access these settings:
Go to App Launcher | AddressTools Administration.
Select Settings from the sidebar.
Click the pencil next to any of the settings.
In Available Countries in PowerSearch, type and select the countries that your business will be verifying addresses in.
If your organization has a country that you’d like to prioritize in the search results, select this country from the Priority Country in PowerSearch picklist.
If you would like to provide an interactive filter to the PowerSearch bar to let users search by country, check the Show Country Filter in PowerSearch.
Click Save.
Note: these three setting will only impact PowerSearch address verification. Automated address verification relies on the country value entered in an existing address.
Batch address verification alerts
Batch address verification runs behind the scenes. This can be a fantastic option to automate address verification in your organization, however errors can happen! For example when a record is verified, an update will be pushed to the record when a result has been found. If, for whatever reason, this record cannot be updated, you need to know the operation has failed!
To ensure alerts are provided in the event of an error, a dedicated email address can be added to the AddressTools settings. By default the email address of the installing user will be populated in this field but you may wish to change this.
Go to App Launcher | AddressTools Administration.
Select Settings from the sidebar.
Click the pencil next to Batch Verification Alert Email Address.
Enter the email address to send the alerts to.
Click Save.
Note: your organization may be required to change the Access to Send Email organization setting to All email. This is located in Setup | Email | Deliverability.