


This blog post is an extension of the Salesforce Trailhead Trail: Prepare Your Data for AI, specifically the module Data Quality.
To follow along in an org, you will need to install a free trial of AddressTools Premium from the AppExchange. If you can’t do that right now, we invite you to read through the steps, check out the screenshots and watch the videos below!
If you’ve landed here from our previous article Why bad data is bad for AI – welcome! If you’ve arrived straight here, you’re welcome to jump right in and let’s learn how to standardise address data in Salesforce!
How to standardise your address data in Salesforce
Without further ado it’s time to dive into our step-by-step guide for making your address data consistent in preparation for AI. Helpfully, Salesforce has already laid out an address data inconsistency problem that we will work through below:


In this scenario, we see a chart of Accounts By State but when we scrutinise the bars, we can see that the data is very inconsistent. California is represented by a number of different values including “Surfin’, USA” “Calif” “California” and “Cali”.
Note: the following steps are completed using the 5* application AddressTools Premium from the Salesforce AppExchange.
So let’s get to work and standardise these inconsistent values!
Select a standardised state format
There are two formats for us to choose from for this state standardisation task:
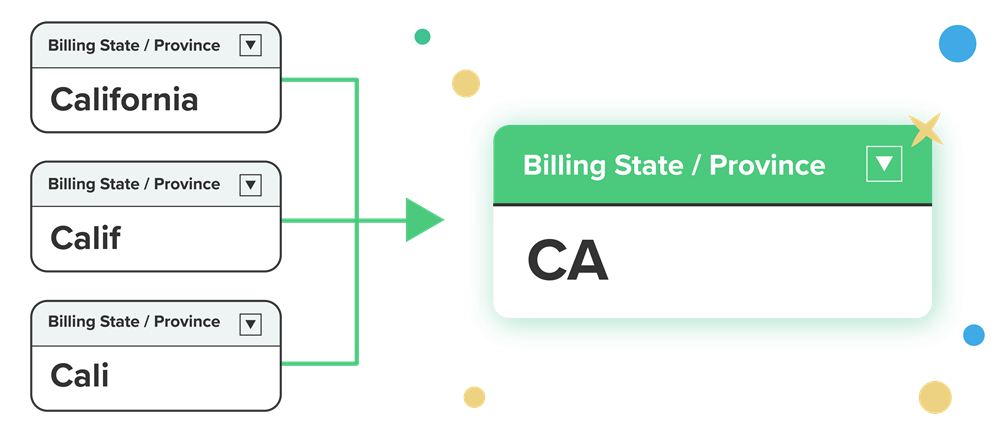
Full name– California.Sub-code value– CA.
For this scenario, we will standardise our inconsistent California values to the sub-code value i.e. CA.
- Go to the
Countriestab. - Choose
All. - Select
Edit - Check
Use Sub Country Code in State field. - Select
Save.

Now we have set up our United States state values to standardise to our desired format: the sub-code value.
Enable state standardisation for an address block
It’s time to enable standardisation. Head to the address blocks section to enable the state standardisation for listed address blocks.
- Navigate to
App Launcher | AddressTools Administration. - From the sidebar, navigate to
Address Blocks. - Select
Editnext to the address block you want to modify. - Scroll to
Global Settings. - Check
Standardize State. - Select
Save.

Turn on standardisation in the package
Yes, this is different to step #2! So far we’ve set our standardisation format and enabled our address blocks for state standardisation. Now, we need to enable the master setting for standardisation functionality within the AddressTools package.
- Go to
App Launcher | AddressTools Administration. - Select
Settingsfrom the sidebar. - Click the pencil next to
Standardization Enabled. - Tick the
Standardization Enabledbox. - Select
Save.
Add the alternative state names
So far we’ve set up our solution so that state values in the US will be standardised to the sub country code e.g. CA, TX. But right now this will only work for recognised values I.e. “California” and “Texas”.
What about these pesky state values like “Cali” and “Surfin’ USA” that we can see on our Accounts report?
We need to add these values to our Alternative State Names object so that our solution will accept them and standardise them too.

Video walkthrough: How to add alternative state values
- Go to the
CountriesObject. - Select
United Statesfrom the Countries List. - Select
Relatedthen selectCalifornia. - Select
Relatedthen add aNewAlternative State Name. - Add each value e.g. “Surfin’, USA”, “Calif”, “Cali”.
- Select
Save.
Now when we enter any of these state values, they’ll all be accepted and standardised as CA. Hello consistent address data!
Video: The results of state standardisation
Add your alternative state values to the installed State object and see how these values are accepted and standardised to the preferred value – in this instance “CA”.
Enjoy consistent address data
And there you have it! In our previous blogpost, Why bad data is bad for AI, we learned about the impact of inaccurate, biased and inconsistent data on AI and then took a closer look at the particular pitfalls of poor address data. In this article, we walked through how to standardise address data with AddressTools, solving Salesforce’s own example of inconsistent “California” state values.
As AI tools become more accessible, and Salesforce invests more resource in its own AI offerings, the importance of high quality data only grows.
We hope this has inspired you to continue on your data journey and we’re always on hand to help you tackle your address data in Salesforce.
Good luck!
Resources
When it comes to AI, it all starts with the data. If you need a place to start your AI journey, we recommend the Salesforce Trailhead Trail this example was taken from: https://trailhead.salesforce.com/content/learn/trails/prepare-your-data-for-ai
If you’re looking to skill up, Salesforce offers a certification called AI Associate which is designed for individuals already familiar with Salesforce CRM. You can learn more about it here: https://trailhead.salesforce.com/en/credentials/associate
If you like the look of how we easily standardised our address data in this article, you can check out AddressTools Premium on the Salesforce AppExchange and get started with a free 2-week trial: https://appexchange.salesforce.com/appxListingDetail?listingId=a0N30000002zt9uEAA
PS. This post was not written by AI 😉