


Geocoding in AddressTools Premium is the process of returning longitude and latitude values alongside a verified postal address. Geocoding enables you to place records on maps, calculate distances, support territory management, and automate location-based tasks within Salesforce.
Access to geocoding functionality requires Address and Geocoding lookups alongside your AddressTools Premium licenses. If your organisation does not currently have access to geolocations, or you would like more information about enabling this feature, contact sales@provenworks.com.
AddressTools geocoding vs Salesforce Data.com geocoding
While Salesforce offers native geocoding for standard address fields (Account Billing & Shipping, Contact Mailing, and Lead Address), the Salesforce Data Integration Rules run asynchronously and restrict geocoding to these specific objects. The platform provides limited control over when it generates coordinates or how you customise the integration.
In contrast, AddressTools Premium returns latitude and longitude instantly as part of the address verification process, works consistently across any object you enable it for, and gives you immediate geolocation data tailored to your workflows. For best results on standard objects where Data.com geocoding is available, we recommend disabling the native Salesforce Data Integration Rules geocoding, via Data Integration Rules in setup, to avoid conflicts or delays and rely solely on AddressTools’ geocoding.
How to configure geocoding
Geocoding will be enabled in your environment if:
- Your org has Address and Geocode lookups.
- You have configured your address blocks to include Longitude, Latitude, and Geocode Accuracy fields.
Assuming that your purchase is active or you’re utilising a geocode trial, the following steps will describe how to edit an existing address block to include the geocoding fields.
This example uses the Account Billing Address fields, the fields used are provided as standard out of the box with Salesforce, however the same steps can be used on a custom address field*.
- Navigate to AddressTools Administration | Address Blocks.
- Locate the specific address block you wish to configure from the table.
- Select the dropdown menu on the right of the row and click Edit.
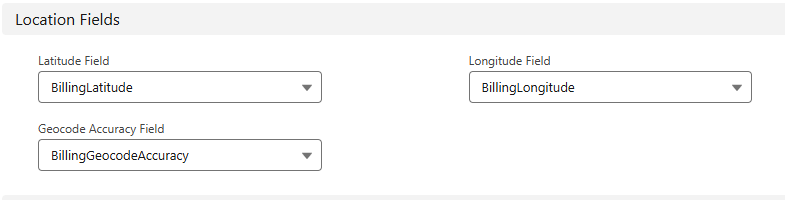
- Find the Location Fields section to map the fields:
- Latitude Field: Select the Latitude field from the dropdown menu (BillingLatitude).
- Longitude Field: Select the Longitude field from the dropdown menu (BillingLongitude).
- Geocode Accuracy Field: Select the Geocode Accuracy field from the dropdown menu (BillingGeocodeAccuracy).
- Save the changes to apply the geolocation settings.
*Note: if you are using a custom object without the Custom Address field enabled, then you will need to create these geolocation fields yourself following the guide: Creating additional fields for address verification
Testing AddressTools geocoding
When setup of verification has been complete, you’re able to test geocoding by following the steps below:
- Verify an Address:
Perform address verification via PowerSearch or your configured automated process. - Check the Geocode Fields:
After the verification completes, inspect the Latitude, Longitude, and Geocode Accuracy fields that you configured in the address block to confirm they contain valid values. You can do this by retrieving the values via an SOQL query. Be aware that verification through PowerSearch will return ‘Unknown’ in the Geocode Accuracy field. Other values will be populated when using automated address verification. - Verify Field Reset Behavior:
AddressTools will reset geolocation fields when any address field changes. This ensures geolocations values always aligns with the verified address. To test this:- Make a modification to an address field (for example, remove or alter the street line), and save the record.
- The Latitude, Longitude, and Geocode Accuracy fields should now be NULL (empty).

