Verification of address data is becoming evermore popular within Salesforce and the options available vary depending on the use case. AddressTools offers a number of verification options for all different requirements.

The Scheduled Address Verification option is best suited for organizations where data is being inserted via integrations in large volumes or where it’s not possible to provide the end user with the ability to verify their entry. It is not dependent on future methods and has the ability to scale up when needed – great! Let’s show you how to set it up!
Firstly, it must be noted that the following instructions assume AddressTools is configured on the address block(s) that you want to verify and that Support Premise-Level Address Verification is enabled.
The solution relies on Salesforce Reports to identify which records need verifying, so let’s start by making a new report.
Navigate to the Reports tab and select New Report. In the pop up, select the Report Type that is associated with the object you wish to verify and press Continue. If you can’t see a Report Type applicable for your use case, you can create a new Report Type in Salesforce Setup.

You have the ability to configure the report however you like. In this example we’re going to configure the report to verify addresses that are:
- based in the “United States”
- created after a certain date
- owned by anyone
As this example is being configured for the Billing Address on the Account object, we’ll select the “Billing Country” field in the filter. It is important to note filter logic is not supported and you do not need to add a filter for the Address Status field as the scheduled process will only verify records that have a “Not Checked” status.

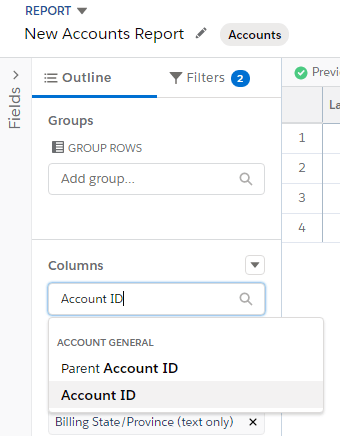
With our filters configured as desired, we now need to add the Record ID column to report to allow AddressTools to identify the records that need verifying.
Select Outline and under the Columns section, search for the ID field for the object you’re wanting to verify and confirm it once found. When the ID field appears in the preview report, use the Order by on the ID field and select Ascending order. You can make further adjustments to the columns visible in the report, just ensure that the ID column is added!
When you’re happy with your report, select Save, give it a name and then store it in the AddressTools report folder. The AddressTools report folder is available in version 7.73+. You can now run the report to confirm that the records you want to verify appear in the list.
Now return to the AddressTools Administration page and select Batch Address Verification from the menu on the left.

Now that you are on the AddressTools Batch Verification page you will see the Object and Fields section. This lists all of the address blocks which are configured on the AddressTools Administration page. Navigate to the relevant address block and select the report which you have created from the Report dropdown.

Now enable the desired row by switching the toggle to Enabled.

Now we’ve done all the hard work, it’s time to start processing these addresses! Before verifying, it’s good practice to run Calculate Now to identify how many addresses we’re going to be verifying in the first job. This is useful to confirm that we’ve set the tool up correctly. Select Calculate Now to begin the process.
A new row will appear in the job history table for each address block that you have configured, the Total column will identify how many records need verifying for the stated job in the Address Block. By adding together each row, you can total the amount of lookups that will be consumed when the job is executed. If you’re happy with the number, we can progress to the verification process.

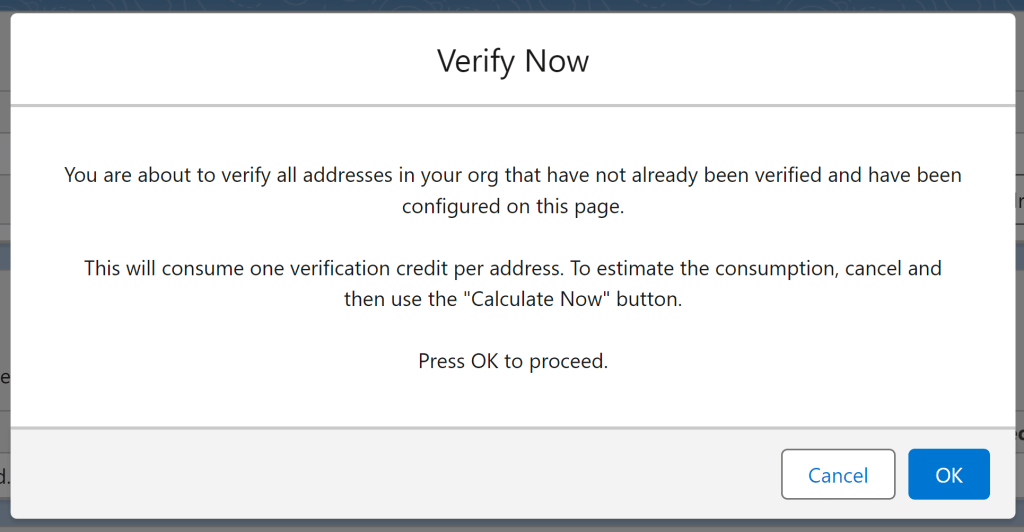
The tool has two options, Verify Now and Schedule. Verify Now will run the verification process once. This can be activated by pressing the Verify Now button.
When doing so, you will be prompted with a warning message to highlight that you are about to verify all the configured addresses that have a “Not Checked” status. If you are happy to continue, select Ok.
The job will begin to run and its status can be seen in the jobs table. If any errors are encountered during the job, the configured alerts email address that is set up in the AddressTools administration page will receive an email highlighting the issues found in the job.
If you don’t want to run the job immediately, select the New Schedule button. This will open a prompt to configure a daily task to verify all your configured addresses with a “Not checked” status. This is designed to verify new addresses that have been inserted into Salesforce each day.
When you select the button, you will be prompted to choose a Scheduled time. Choose a time and select Save to confirm your selection and create the job.

The job will now be visible in the Schedule section. If you ever want to delete the job select the click here link under the table and use the del action next to the job named Daily Batch Premise-Level Address Verification.

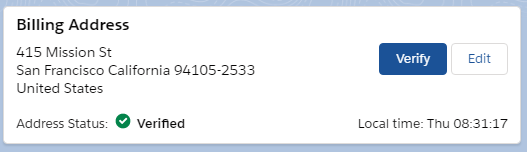
Now you’re all set! After the first job has been completed, you can check your records and you’ll see that it will now have one of the verified statuses associated!
Back to the AddressTools Premium installation walkthrough
Want to try it out for yourself?
AddressTools Premium is available to try for free on the AppExchange. Give automated daily address verification a go!