


This article will cover how to create and configure your custom address block with AddressTools allowing for all trigger based and interactive functionality.
Note: Custom address block functionality requires AddressTools Premium. If you use AddressTools Free, start a Premium trial.
In the following example, we will be covering how to configure a custom address block that we have created on a custom object that uses individual custom fields for each address field. The same steps can be used with a custom address field type; however we recommend using individual field elements due to the limitations that Salesforce State & Country/Territory picklists enforce.
Task overview:
- Create the address block fields on the object.
- Create the address verification fields (Premise-Level only).
- Configure the address block and verification in AddressTools.
- Create the custom trigger.
- Optional: Add the override component.
- Optional: Add the on page component.
Create an address block in the custom object
The following steps assume you are taking the approach of using individual fields for each address element. It is recommended to review this step even if you have already created your address fields. This is the ensure each field is of the right type before moving forward with the rest of the configuration.
- Go to Setup | Object Manager | [Your Object] | Fields & Relationships.
- Select New to create each of the following address block fields:
- Street – Text Area (255).
- City – Text (255).
- State – Text (255).
- Country – Text (255).
- Postal Code – Text (255).
Create address verification fields (needed for Premise-Level)
If you want to utilize address verification functionality with the new address block, you will be required to create an Address Status field at a minimum. For optional fields such as County or Address Label that are also populated when using Address Verification, see the article: Creating additional fields for address verification.
- Go to Setup | Object Manager | [Your Object] | Fields & Relationships.
- Select New.
- Choose the data type: Picklist.
- Select Next.
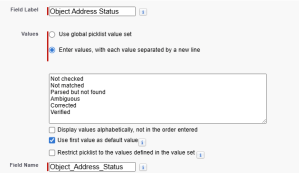
- Add a Field Label (we suggest the address type plus address status, i.e. Billing Address Status)
- Select Enter values, with each value separated by a new line.
- Add the following values to the text area:
- Not checked *mark as the default value
- Not matched
- Parsed but not found
- Ambiguous
- Verified
- Uncheck Restrict picklist to the values defined in the value set.
- Select Next.
- Provide visibility to all the users who will be verifying addresses, this can also be handled in a permission set afterward if preferred.
- Select Next and Save.
Configure address block and verification.
With the objects and fields created, it is now essential to map them with AddressTools via the Administration page.
- Go to App Launcher | AddressTools Administration | Address Blocks.
- Select Add, choose [Your Object] from the dropdown.
- If you desire functionality on a specific record type, choose the record type from the options. Leaving this blank will apply the functionality to all.
- Select Next.
- In Postal Address Fields, complete each dropdown with the corresponding API name from your object.
- In Additional Address Fields, complete the Status Field (and any additional fields) by choosing the corresponding object API name from the dropdown.
- If necessary, in Address Verification Options, select Enable Premise-Level Address Verification.
- Enable settings as required for the address block and Save.

Create custom trigger
A trigger is required on the objects that contain address fields that are configured with AddressTools. Without the trigger, most functionality will not fire and other functionality may appear to not behave as intended.
- Go to Setup | Object Manager | [Your Object] | Triggers.
- Click New to create a trigger.
- Replace the default code in the text field with the following code snippet:
trigger ValidateOBJECTLABELCountryFields on OBJECTAPI (before insert,
before update) {
   pw_ccpro.CountryValidator2.Validate (Trigger.new, Trigger.oldMap);
}
- In this code snippet, replace OBJECTLABEL with the object name and OBJECTAPI with the correct API name.
- Save your new trigger.
How to add the override component
The AddressTools Override component is an advanced lightning component built to replace the standard “New Record” popup that your users experience when creating a new record in Salesforce.
To override the New Record model in Salesforce Lightning:
- Navigate to Setup | Object Manager | [Object to override] | Buttons, Links and Actions.
- For the New button, select the arrow to reveal options and choose Edit.
- Set Lightning Experience Override to Lightning Component.
- Choose pw_ccpro__AddressToolsOverride from the picklist.
- Select Save.
Repeat the above steps for all of the objects you want to override the new record model with.

How to add the on page component
The AddressTools Record Page Component is your one-stop widget for handling anything address related on a record. The component is designed to sit on a lightning record page where an address block exists giving your users quick access to everything they need without distraction.
To add the AddressTools Record Page Component to a lightning record page:
- Navigate to Setup | Object Manager | [Object] | Lightning Record Pages.
- Select New or if a Lightning Record Page already exists, select Edit.
- Drag the AddressTools Component from the components list onto the layout.
- Choose the Address block.
- Optionally, type into the Component header title to add a custom title.
- Select Save.

If the page has not yet been activated, a prompt will appear asking you to activate it. Follow the steps below to assign the page in the organization.
- Select Activate.
- The page can be assigned based on different levels, for example set the Org Default by pressing Assign as Org Default.
- Review the page assignment changes.
- Select Save.