It’s no secret that managing price books in Salesforce isn’t the easiest of operations. Whether it’s updating existing prices, or creating new ones for seasonal promotions, it can be a thankless task that ends up consuming hours of admin time. It’s why many teams favour handling this operation in a shared spreadsheet document which can then be imported into Salesforce.
Import price book information into Salesforce
Impowr is the perfect tool for importing the price book information with just a drop of the file. Since Impowr supports workbooks with multiple sheets, complex spreadsheet formulas, and isn’t just limited to CSV files, the solution really empowers those who wish to leverage the benefits of a spreadsheet document and get that data into Salesforce seamlessly.
The structure of pricing and promotion data rarely change. This means that teams can rely on Impowr’s saved mapping feature to store how the data should be imported. This means you can focus on what is important – managing pricing information.
In the event of needing to insert and update data in a single operation, you can configure the tool to execute an upsert, therefore saving the process of splitting out the import into two jobs. Furthermore, if the mapping of objects and field metadata rarely changes, leveraging the ManagedImport component in a dedicated App page can provide your Salesforce users with a “one-stop-shop” for importing the data.
Immediate benefits of using Impowr
Allow team members to leverage tools that are more native to the audience.
Encourage and promote cross team collaboration using shared spreadsheets before committing the changes to Salesforce.
Streamline the process to a single task by using the upsert operation.
Remove repeat activities by leveraging saved mappings in the Impowr application.
Supporting workbooks and complex formulas gives you the control you need to be productive in your day without fears of tech incompatibilities. This enables you and your teams to continue at the pace you want by using Impowr in your Salesforce organisation.
What’s next?
Learn more, book a demo and get a trial of Impowr by ProvenWorks.
If we had a slice of cake each time a prospect reached out to us asking for help to streamline their importing process for the Opportunity Line Item object, the ProvenWorks team would be living off cake. It is no exaggeration that this object is the one we hear about the most.
How does SimpleImport help with importing opportunity line items?
That answer can be different per use case due to the quirks associated with the object. Nevertheless, what all these use cases have in common is our ManagedImport component. With its “pass current record ID” functionality, the component takes a huge load of admin out of the import process when working with Opportunities.
This functionality allows users to import products directly on the Opportunity record, without the need to fetch a record ID or some unique identifier for the excel file. This is ideal for orgs who receive orders in a spreadsheet document that need loading into Salesforce.
Import related records quickly
Let’s break that down further. I have a list of products in a spreadsheet file that an existing account wants to purchase. I open the opportunity for the account, use the ManagedImport component, and I simply drop the file with the products in into the modal.
Those line items will now be inserted to the Opportunity Line Item object and automatically are related to the opportunity record that I am looking at. This will allow us to create a list of products to be purchased by the customer in a few seconds. No more faffing about getting record IDs or a unique piece of data from Opportunity. Let the tool do the work!
Immediate benefits of using SimpleImport
Quickly load opportunity products to existing opportunities and require little training to do so.
Pass current record ID functionality in ManagedImport removes the requirement to edit the file prior to import and mitigates potential mistakes.
Support for workbooks with multiple sheets allows you to distribute and share complex workbooks with your customers that can be loaded directly into Salesforce without having to export a CSV.
What’s next?
We’ve written a step-by-step guide explaining how to use SimpleImport for importing opportunity products.
Learn more, book a demo and get a trial of SimpleImport by ProvenWorks.
Use of Digital Experiences (previously known as Communities) have been growing in popularity since their launch, with even more adoption since the repositioning of Salesforce Experience Cloud.
Salesforce Experience Cloud implementations have been expanding with use cases growing where external users need to interact with an internal CRM. Some of these use cases even include importing data – this is where we come in!
A digital experience can be used in so many contexts: partner portals, e-commerce sites, or even franchisee hubs. With lots of different audiences come lots of reasons why users need to import data.
Empower external users to import
One of our favourite use cases to date has involved importing annual employment diversity data of over 40,000 registered businesses based within an allocated region. Each entity was already using a spreadsheet to collect all the required data, but it was previously left to a single admin to manually import all the data that was received via email across a one-month period.
With the aim to cut out the middleperson, they worked with Salesforce and ProvenWorks to roll out a new Digital Experience which had SimpleImport’s ManagedImport component as a way of importing all the data into Salesforce.
With the component in place on the Digital Experience and the import mapping configured, the business entities could drag and drop their spreadsheets onto the component, importing the data themselves.
Immediate benefits of using SimpleImport
Emails are no longer being sent to the incorrect email address which potentially resulted in leaked data.
Internal teams can run reports in Salesforce to see which businesses were yet to import their data. Additionally, automated processes can then send notifications to the correct contacts.
Mistakes are highlighted to the businesses at point-of-entry, so they are able to correct any missing data.
The admin previously in charge of the process no longer has to download all email attachments and import their data.
SimpleImport acknowledges the user’s permissions, so the digital experience users only need write permissions to their custom object. There is no concern that they would be able to use SimpleImport to access data that they should not have access to.
What’s next?
Learn more, book a demo and get a trial of SimpleImport by ProvenWorks.
Salesforce Flows give admins a chance to implement advanced processes into their org with clicks, not code. Here at ProvenWorks, we want to empower admins to do more, so building on the capabilities of Salesforce Flows, AddressTools Premium allows you to configure an automated address verification process with no coding knowledge.
This article covers configuring a Salesforce Record-Triggered Flow to queue an address verification process on a record that invoked the flow. This produces a verified address within moments of the flow being triggered. It is dependant on Salesforce Future Methods so be aware that there is expected to be a slight lag between the record being inserted/updated and the address being verified.
Pre-requisites
The component used in the flow comes as part of the AddressTools Premium package. An additional purchase of address verification lookups will be required.
If you’re new to AddressTools Premium, please contact info@provenworks.com with your Org ID to have the team enable your org for batch address verification. Without doing this your org will be unable to verify addresses.
With AddressTools Premium installed, the following configurations will require:
An address block to be configured in the AddressTools Administration page,
An address status field for the address block,
Verification enabled for the org and specifically the address block.
Create a Record-Triggered Flow to verify addresses in Accounts
The following example is going to follow verifying the billing address block on accounts using a Record-Trigger Flow on insert and update. This process can be adapted to any object and address block of your choice assuming it’s configured with AddressTools.
Go to Salesforce Setup | Flow.
Select New Flow.
Choose Record-Triggered Flow.
Search and select the object that you are configuring the process for.
Set Trigger the Flow When to A record is created or updated.
Select Done.
Configure Start
Object Account
Set entry conditions.
Configure Trigger A record is created or updated.
Condition requirements All Conditions Are Met (AND).
We’ll choose the address status field configured with the address block. For this scenario: pw_ccpro__BillingAddressStatus__c Equals Not checked. This step is essential to ensure we do not create an infinite loop of updating the record.
When to Run the Flow for Updated Records Every time a record is updated and meets the condition requirements.
Optimize the Flow For Actions and Related Records.
Done.
Configuring an Apex Action
Click the plus sign to add an element
Add Action| Filter By Type | Apex Action
Action: Premise-Level Address Verification
Label Verification of addresses
API Name Verification of addresses
Set Input Values
Country-Field API Name: BillingCountry (This value is the API name of the country field configured in the address block. For example, the Mailing Country on Contact would be MailingCountry). To verify all address blocks on the record, leave the paramter empty.
ID of record to validate: {!$Record.Id} (This takes the record ID from the record that invoked the flow).
Done.
Save the Flow
Select Save in the top right.
Provide a Flow Label to help you identify the flow in the future.
The Flow API Name will autofill.
Click Save.
Activate the flow.
Testing the Flow
With the flow created and activated, we can now test it in the org.
Note: before testing the flow, we recommend ensuring you have the Batch Verification Alerts Email field populated in AddressTools Administration with your email address.
Go to a test account in the Org.
Edit the billing address.
Save the record.
This will invoke the flow and it may take a few seconds to return the status. If the address status field has not updated by the time the page refreshed, give it a moment and refresh the page.
Book a free demo
We love talking about all things address related! See AddressTools, our address data solution for Salesforce, on a free demo.
Within the Scheduled Screening section, select Enable Scheduled Screening to create a Scheduled Job that will execute each day, screening Not Screened and Overdue numbers.
To manage or delete the scheduled jobs, select Click here to view or delete scheduled jobs using the Salesforce Scheduled Jobs viewer.
PhoneTools will now have a daily job to execute a batch job to screen all configured records that have not yet been screened or are overdue. This is calculated from the Next Screen Due date field on the records.
To allow users in the organization to check the status of a phone number on a record, you will need to add the PhoneTools lightning component to the lightning record app page.
Go to Setup | Object Manager.
Navigate to the object that you would like to add the PhoneTools component to.
Select Lightning Record Pages.
If you already have a record page, select its label and press Edit. Or choose New if you would like to configure a new record page.
Select PhoneTools from the Lightning Components list on the left of the screen and drag the component to your desired location on your page layout.
In the panel on the right of the screen, select Enable screening.
Press Save, and Activate if required.
Note: you can use Add Filter to create rules for when the component is visible. i.e hide if phone field is empty.
Fields to screen is the heart of the application. It tells PhoneTools which fields in your organization need screening. PhoneTools will only screen phone fields that are configured and have the Enabled Screening checkbox enabled. We will cover this more in the article.
What’s available out the box?
Out of the box, PhoneTools comes configured with the following fields but by default, will NOT have Enabled Screening checked:
Account.Phone
Account.Fax
Contact.Phone
Contact.HomePhone
Contact.MobilePhone
Contact.AssistantPhone
Contact.OtherPhone
Lead.Phone
Lead.MobilePhone
Adding additional phone fields
You can add additional phone fields to the configuration.
Go to App Launcher | PhoneTools Administration.
Navigate to the Configuration tab.
Select Add Field.
Select the Object.
Select the Phone Field.
Choose the appropriate fields discussed in in the picklists.
Press Save.
Enabling screening on phone fields
With the phone fields now configured with PhoneTools, we can enable them for screening.
Go to App Launcher | PhoneTools Administration.
Navigate to the Configuration tab.
Select edit next to the field that you would like to enable screening for.
Select Enable Screening and four picklists will appear.
Choose the appropriate fields in the Phone Status Field, Next Screen Due Field and Screening results Field picklists (as discussed in the previous article).
Select Save.
Repeat this step for each field that is to be enabled for screening.
Verification of address data is becoming evermore popular within Salesforce and the options available vary depending on the use case. AddressTools offers a number of verification options for all different requirements.
The Scheduled Address Verification option is best suited for organizations where data is being inserted via integrations in large volumes or where it’s not possible to provide the end user with the ability to verify their entry. It is not dependent on future methods and has the ability to scale up when needed – great! Let’s show you how to set it up!
Firstly, it must be noted that the following instructions assume AddressTools is configured on the address block(s) that you want to verify and that Support Premise-Level Address Verification is enabled.
The solution relies on Salesforce Reports to identify which records need verifying, so let’s start by making a new report.
Navigate to the Reports tab and select New Report. In the pop up, select the Report Type that is associated with the object you wish to verify and press Continue. If you can’t see a Report Type applicable for your use case, you can create a new Report Type in Salesforce Setup.
You have the ability to configure the report however you like. In this example we’re going to configure the report to verify addresses that are:
based in the “United States”
created after a certain date
owned by anyone
As this example is being configured for the Billing Address on the Account object, we’ll select the “Billing Country” field in the filter. It is important to note filter logic is not supported and you do not need to add a filter for the Address Status field as the scheduled process will only verify records that have a “Not Checked” status.
With our filters configured as desired, we now need to add the Record ID column to report to allow AddressTools to identify the records that need verifying.
Select Outline and under the Columns section, search for the ID field for the object you’re wanting to verify and confirm it once found. When the ID field appears in the preview report, use the Order by on the ID field and select Ascending order. You can make further adjustments to the columns visible in the report, just ensure that the ID column is added!
When you’re happy with your report, select Save, give it a name and then store it in the AddressTools report folder. The AddressTools report folder is available in version 7.73+. You can now run the report to confirm that the records you want to verify appear in the list.
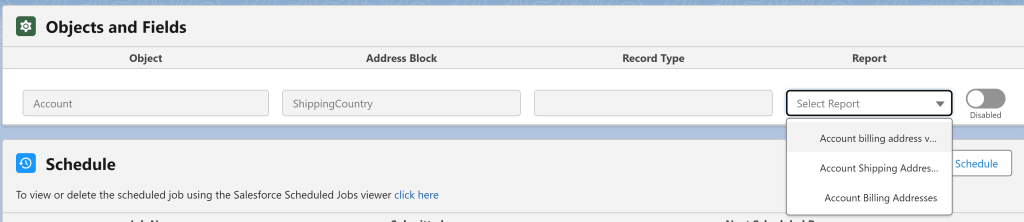
Now return to the AddressTools Administration page and select Batch Address Verification from the menu on the left.
Now that you are on the AddressTools Batch Verification page you will see the Object and Fields section. This lists all of the address blocks which are configured on the AddressTools Administration page. Navigate to the relevant address block and select the report which you have created from the Report dropdown.
Now enable the desired row by switching the toggle to Enabled.
Now we’ve done all the hard work, it’s time to start processing these addresses! Before verifying, it’s good practice to run Calculate Now to identify how many addresses we’re going to be verifying in the first job. This is useful to confirm that we’ve set the tool up correctly. Select Calculate Now to begin the process.
A new row will appear in the job history table for each address block that you have configured, the Total column will identify how many records need verifying for the stated job in the Address Block. By adding together each row, you can total the amount of lookups that will be consumed when the job is executed. If you’re happy with the number, we can progress to the verification process.
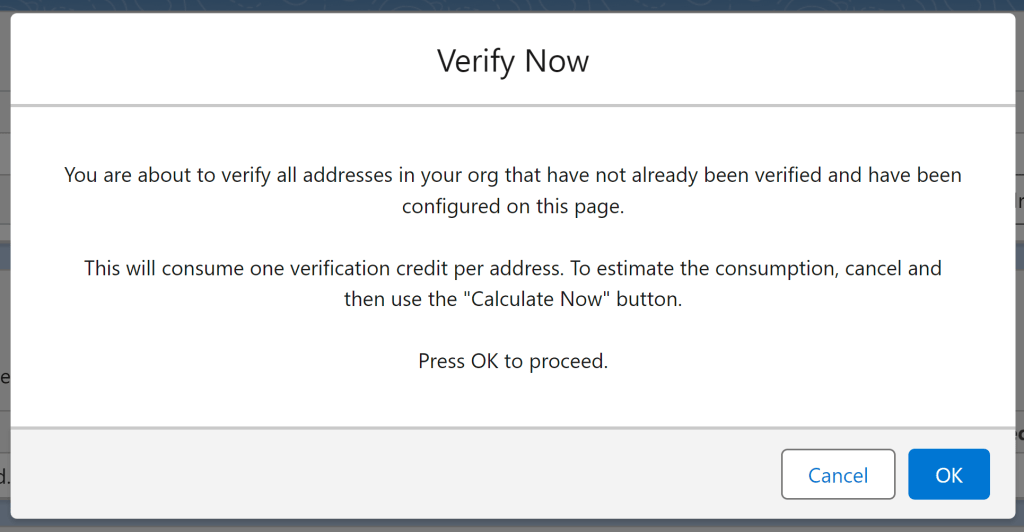
The tool has two options, Verify Now and Schedule. Verify Now will run the verification process once. This can be activated by pressing the Verify Now button.
When doing so, you will be prompted with a warning message to highlight that you are about to verify all the configured addresses that have a “Not Checked” status. If you are happy to continue, select Ok.
The job will begin to run and its status can be seen in the jobs table. If any errors are encountered during the job, the configured alerts email address that is set up in the AddressTools administration page will receive an email highlighting the issues found in the job.
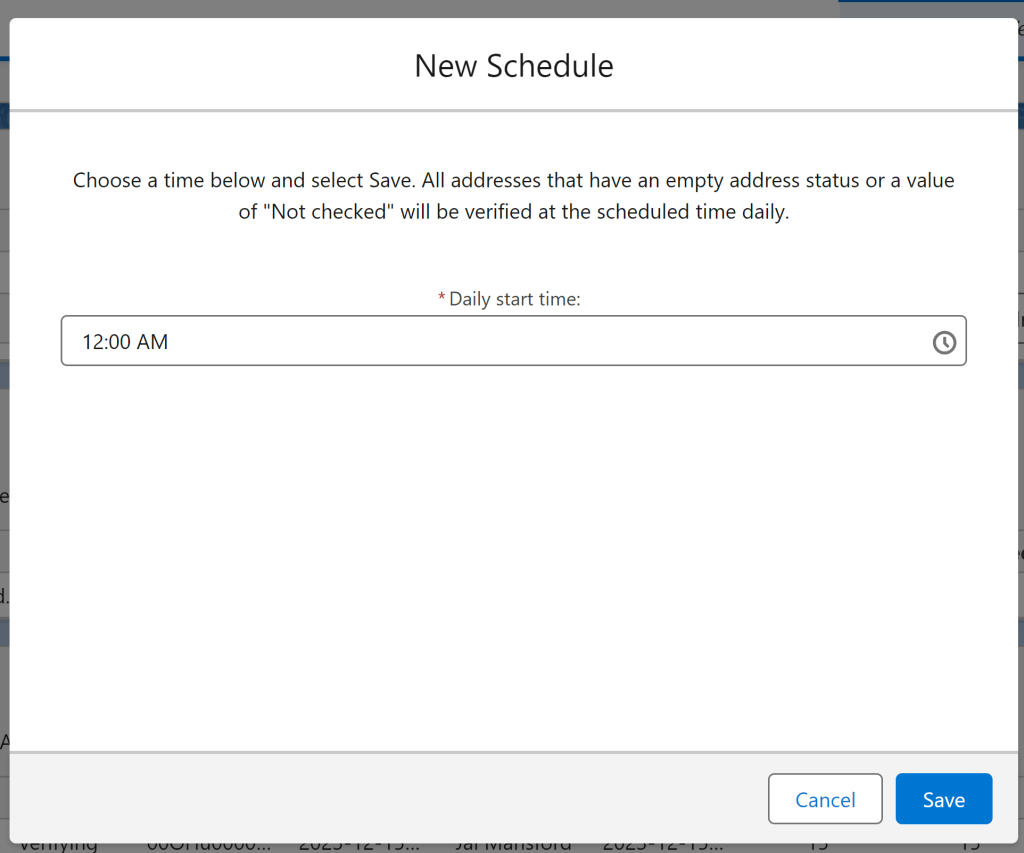
If you don’t want to run the job immediately, select the NewSchedule button. This will open a prompt to configure a daily task to verify all your configured addresses with a “Not checked” status. This is designed to verify new addresses that have been inserted into Salesforce each day.
When you select the button, you will be prompted to choose a Scheduled time. Choose a time and select Save to confirm your selection and create the job.
The job will now be visible in the Schedule section. If you ever want to delete the job select the click here link under the table and use the del action next to the job named Daily Batch Premise-Level Address Verification.
Now you’re all set! After the first job has been completed, you can check your records and you’ll see that it will now have one of the verified statuses associated!
To provide the best experiences, we use technologies like cookies to store and/or access device information. Consenting to these technologies will allow us to process data such as browsing behavior or unique IDs on this site. Not consenting or withdrawing consent, may adversely affect certain features and functions.
Functional
Always active
The technical storage or access is strictly necessary for the legitimate purpose of enabling the use of a specific service explicitly requested by the subscriber or user, or for the sole purpose of carrying out the transmission of a communication over an electronic communications network.
Preferences
The technical storage or access is necessary for the legitimate purpose of storing preferences that are not requested by the subscriber or user.
Statistics
The technical storage or access that is used exclusively for statistical purposes.The technical storage or access that is used exclusively for anonymous statistical purposes. Without a subpoena, voluntary compliance on the part of your Internet Service Provider, or additional records from a third party, information stored or retrieved for this purpose alone cannot usually be used to identify you.
Marketing
The technical storage or access is required to create user profiles to send advertising, or to track the user on a website or across several websites for similar marketing purposes.