Blog

Create a Contact with a Clean Address in a Salesforce Screen Flow

Introduction

Typeahead address searching in a CRM enhances efficiency by quickly suggesting relevant address options as the user types. This offers several benefits. Firstly, it results in reduced manual entry time and effort. It also improves data accuracy with up-to-date address databases and auto-completion that directly minimise errors. Lastly, it can also provide functionality to standardise addresses for consistency.

Key benefits:

  • Improved efficiency by suggesting relevant addresses as a user types.
  • Enhanced data accuracy through integration with up-to-date address databases and auto-completion.
  • Standardised addresses for consistency and easy analysis.
  • Intuitive searching for enhanced user experience and productivity.
  • Reduced manual entry time and effort.

What are Salesforce Flows?

Salesforce Flows give admins a chance to implement advanced processes into their Org with clicks, not code. Many additional components such as typeahead address entry have been designed by developers allowing anyone to implement and utilise such functionality with little technical knowledge.

To optimise the address entry process, we are going to look at the Address Verification Flow Component by ProvenWorks designed to verify address data at point of entry.

What are some of common use-cases for creating Contacts in a Flow?

There are so many use cases available – way too many to list here! Nevertheless, here are some key ones that can spark your imagination:

  • Service agents needing to create new Contacts at speed
  • Customers entering their information in an online checkout
  • New users registering their details to access a service

What is typeahead address search?

The typeahead address search allows users to start typing an address and a list of addresses will be presented associated with the text entered. Once a user clicks on an address in the list, the address will be populated into a familiar address fields format.

This is preferred to traditional address entry where users must individually enter the relevant address data in full into separate street, city, state, postal code and country fields.

What does this article cover?

We’ve established that a typeahead address search can improve user efficient and the quality of data, and we’ve also explored use cases where Salesforce Flows can optimise record entry in Salesforce. Now let’s combine the two and explore a common use case for Salesforce Flow Screens: Service agents capturing a Contact’s information where we’ll also implement typeahead address search to capture the address.

In this article, we’ll cover:

  • Creating a new Flow to create a new Contact
  • Utilising a Flow Screen to capture the Contact fields
  • Implementing typeahead address search functionality with the Address Verification Flow Component by ProvenWorks, and
  • Saving this information to a new Contact record.

Pre-requisites

Your Salesforce Org will require two managed packages available from the Salesforce AppExchange to obtain the typeahead address entry component.

It must be noted that these packages are paid for, with return on investment realised through improved staff efficiencies, reduced process abandonment, and better data quality.

💡  Do you have any questions before getting started? Contact us at support@provenworks.com.


Create a new Screen Flow

We’ll start by creating a new Salesforce Screen Flow and creating a new variable to store the Contact details being entered.

  • Go to Salesforce Setup | Flow
  • Select New Flow
  • Choose Screen Flow
  • Select Done
  • Add New Resource | Variable
  • API Name we used NewContact
  • Data Type | Record
  • Object | Contact
  • Select Save


Add a Screen to the Flow to capture the Contact’s information

Now we’ll introduce a Screen element to the Flow which will be responsible for capturing the Contact’s information. This information will be captured in dedicated fields that will eventually be saved to a new record.

  • Add Element | Screen
  • Name the Screen
  • Navigate to Fields (Next to Components) | Record Variable | NewContact
  • Drag the following fields onto the Screen:
    • First Name
    • Last Name
    • Email
    • Optionally add any additional fields that you need to capture, i.e. Mobile Number, but leave out the Address fields for now.
  • Navigate back to Components in the panel on the right of the Screen editor.
  • Add Address Verification by ProvenWorks into the Screen. 
  • Click on the Address Verification by ProvenWorks component to open the component parameters on the right of the interface.
  • Scroll down the parameters and tick Manually assign variables
  • Assign the following Values:
    • City Value > {!NewContact.MailingCity}
    • Country Value > {!NewContact.MailingCountry}
    • Postal Code Value > {!NewContact.MailingPostalCode}
    • State/Province Value > {!NewContact.MailingState}
    • Status Value > {!NewContact.pw_ccpro__MailingAddressStatus__c}
    • Street Value > {!NewContact.MailingStreet}
  • Click Done


Create the Contact Records

Now that we’ve completed a Flow Screen to capture the Contact’s information, we need to save it to a new Contact record in Salesforce.

  • Add Element | Create records
  • Name the Label
  • Create a Record from These Values | Record | NewContact
  • Click Done


Save the Flow

With a Flow now capable of capturing Contact information and saving it to a new Contact record, let’s save the Flow so we can utilise it in our Salesforce Org.

  • Select Save
  • Provide a Flow Label to help you identify the flow in the future, i.e. “Service Agent Contact Capture”
  • The Flow API Name will be auto populated, change this if required.
  • Click Save
  • Activate the flow


Copy the Flow’s URL

  • From Setup, enter in the Quick Find box, and then select Flows
  • Click the down arrow in the Flow we created, then click View Details and Versions
  • Copy the flow’s URL from the Flow Detail page


Incorporate the Flow into a Button

Buttons are a great way to distribute Flows to users in Salesforce. If you have a service agent taking calls, providing them an easy to access button to create a new contact can be a speedy way to get the job done with little hassle.

  • Go to Salesforce Setup | Contact | Buttons, Links, and Actions
  • Select New Button or Link
  • Label | Verify New Contact
  • Name | Verify_New_Contact
  • Display Type | List Button
  • Behaviour | Display in existing window with sidebar
  • Content Source | URL
  • Select Field Type | Contact
  • Paste the Flow’s URL link we copied earlier in the large text box like the example below (your link may differ as it is dependent on naming)
  • Click Save


Add the Button onto the List View Button Layout

  • Go to Salesforce Setup | Object Manager | Contact | List View Button Layout
  • List View Button Layout | Edit | Custom Buttons
  • Add the newly created custom button to Selected Buttons
  • Click Save


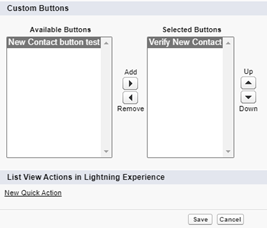
The Button will now be available in the Contact List View


Summary

And there you have it – our complete follow-along guide for creating a Screen Flow to enter a Contact record with a verified address!

We hope this article has given you the tools you need to set up your Salesforce CRM for better address data quality alongside a better use experience. If there’s anything you’re stuck on, or if you have any questions, please don’t hesitate to get in touch with us.

Contact us at support@provenworks.com

If you’re ready to get started with your own address data journey, why not jump on a kick off call with our team and let’s help you make the most of your Salesforce investment!

[Calendly – AddressTools]

Everything you need to know about the Address Verification Flow Component (Summer ’23 Release)

Please note: To leverage this component, your org must have AddressTools Premium installed from the AppExchange with Address Verification lookups.

We always look to improve our products and the Address Verification Flow Component is no different! We have been hard at work enhancing the component with additional functionality to improve your user experience and up your address data game. 

Here is the list of updates we will cover in this article: 

  • Custom CSS is now available via a Salesforce Flow Screen 
  • Users no longer need “View All Custom Settings” permission enabled on their profile 
  • Additional accessibility tags have been implemented 
  • Improved search results by filtering and prioritising countries 
  • Street Line 2 parameter 
  • Release notes 
  • How to upgrade 

Custom CSS is now available via a Salesforce Flow Screen

Ensuring a Salesforce Org matches your company’s branding is important, and even more so in digital experiences. We want to ensure that you don’t need to compromise your visuals when using our flow component. We’ve made changes to simplify adding a CSS file to the component so that you no longer need to wrap it in an Aura component first.

Learn how to apply custom CSS using Additional Styles. 

Users no longer need “View All Custom Settings” permission enabled on their profile 

Previously, users required the “View All Custom Settings” permission on their profile to utilise the Address Verification Flow Component. This is now no longer a requirement; all you need to do is update the package and then the permission can be revoked. 

Additional accessibility tags have been implemented 

We believe our tools should be able to be used by everyone, and that’s why we’ve improved the accessibility tags within the flow component to make them more descriptive. 

Improved search results by filtering and prioritising countries 

We understand how important it is to provide the most relevant results first when looking up an address. That’s why we’ve implemented ‘Top Priority Country’ to help promote the best results, saving the user time and reducing keystrokes.

Here is how to implement this feature. 

Street Line 2 parameter

Adding Street Line 2 provides the flow component with the ability to split the street responses across 2 fields. This feature means it is easier to comply with strict character limits you might face. Street Line 2 is now available in the Address Verification Flow Component.

Here is our guide on how to enable 2 Street Line Address. 

Release Notes

To see the full list of enhancements and improvements, please refer to the Release Notes. 

How to Upgrade

To access the new features, you will need to upgrade the Address Verification Flow Component package. You can upgrade your version of the AddressTools Verification Flow Component by installing the latest package from the AppExchange. 

Upgrade now

Address Verification Flow Component: Display Company Name in Address

Prerequisites

  • The AddressTools Flow Component is installed in your organisation, find it here on the AppExchange.
  • The AddressTools Flow Component will need to be in a Screen-Flow before starting the configuration. If you need to add the component to a Screen-Flow, the steps of how to achieve this can be found here.

Display Company Name in Address

  • Navigate to your Salesforce Flow in Salesforce Setup
  • Click the Address Verification by ProvenWorks component that you previously setup.
  • Ensure that Return Company in Street is set to {!$GlobalConstant.True}.

Back to the Address Verification Flow Component installation walkthrough

Address Verification Flow Component: Understanding the Parameters

What Does Each Parameter Do?

  • Additional Styles – This field is responsible for applying custom CSS themes to the component, a guide on how to use this can be found here.
  • Address Label – This field is responsible for changing the text in the Address header.
  • Allowed Countries – Allows a string of ISO-2 or ISO-3 values for countries to limit PowerSearch results to.
  • City Label – This field is responsible for changing the text in the City field label.
  • City Value – This field allows you to preset a value for the City field to be auto-filled before entering the address.
  • Country Label – This field is responsible for changing the text in the Country field label.
  • Country Value – This field allows you to preset a value for the Country field to be auto-filled before entering the address.
  • County Label – This field is responsible for changing the text in the County field label.
  • County Value – This field allows you to preset a value for the County field to be auto-filled before entering the address.
  • Inline Mode – Allows users to edit fields without having to toggle between a ‘read-only’ view and an ‘edit’ view.
  • Manual Button Label – This field is responsible for changing the text on the Manual button.
  • Postal Code Value – This field allows you to preset a value for the Postal Code field to be auto-filled before entering the address.
  • Read-only Mode – When set to {!$GlobalConstant.True}, this prevents the user from being able to input an address.
  • Return Company in Street – When set to {!$GlobalConstant.True}, this will display the company name in the street output.
  • Search Label – This field is responsible for changing the text in the Search field label.
  • State/Province Label – This field is responsible for changing the text in the Province field label.
  • State/Province Value – This field allows you to preset a value for the Province field to be auto-filled before entering the address.
  • Status Label – This field is responsible for changing the text in the Status label.
  • Status Value – This field allows you to preset a value for the Status field to be auto-filled before entering the address.
  • Street Label – This field is responsible for changing the text in the Street field label.
  • Street2 Label – This field is responsible for changing the text in the Street2 field label.
  • Street2 Value – This field allows you to preset a value for the Street2 field to be auto-filled before entering the address.
  • Top Priority Country – This field allows for a singular ISO-2 or ISO-3 country which is then used to prioritise results.
  • Use County – When set to {!$GlobalConstant.True}, this will display a county field for search results.
  • Use Second Street Line – A guide on how to enable Street2 can be found here
  • Use Status– When set to {!$GlobalConstant.True}, this will display the verification status of the search result.
  • Verify Button Label – This field is responsible for changing the text on the Verify button.

Address Verification Flow Component: Apply Custom CSS Using Additional Styles

Within the Address Verification Flow Component, you have the ability to edit all of the visual aspects allowing you to achieve a personalized final look.

How to Create a Custom Style Sheet

  • First, save and edit the code template which can be found below – ensure it is saved as a CSS file.
  • This template illustrates some of the basic changes that can be made, but any CSS functionality is supported.
.powersearch .form-element-label
{
color: Blue;
font-size: 15px;
}


.powersearch
{
font-size: 12px;
color: Green;
background: white;
}


powersearch .form-element-input,
powersearch .form-element-textarea,
powersearch .form-element-select
{
border: 1px solid Black;
}


.powersearch .form-element-button
{
color: Aquamarine;
}


.powersearch .form-element-input,
.powersearch .form-element-textarea,
.powersearch .form-element-select,
.powersearch .slds-input
{
border-color: DarkMagenta;
}


.powersearch .form-element-input:focus,
.powersearch .form-element-input:active,
.powersearch .form-element-textarea:focus,
.powersearch .form-element-textarea:active,
.powersearch .form-element-select:focus,
.powersearch .form-element-select:active,
.powersearch .slds-input:focus,
.powersearch .slds-input:active
{
border-color: Navy;
}


How to Upload the Custom Styling

  • Navigate to Salesforce Setup | Static Resources.
  • Create a new Static Resource, select Choose File and upload the CSS file.
  • After clicking Save, on the Record Page click View File

  • Copy the end of the URL from /resource onwards, for example: /resource/1686062712000/ExampleCSS
  • Navigate over to the flow that you would like to apply this styling to.
  • Open the Screen that you are editing and then select the Address Verification by ProvenWorks component that you have added.
  • Under Additional Styles paste the extract from the resource URL that you copied


Before vs After

Before applying the custom styling:


After applying the custom styling:

Back to the Address Verification Flow Component installation walkthrough

How to increase your productivity: a toolkit for all Trailblazers

There are tons of tools out there to assist with productivity, and yes, they can really help. But ultimately, it comes down to you and your desire to be productive.

After 9 years in the Salesforce Ecosystem, and tons of insights from Salesforce experts, I’m going to share with you 5 of my favourite hacks for being as productive as possible whilst having fun along the way!


1. It’s all in the prep

Do you have a to do list? How far ahead do you plan? Do you know when you’re the most productive?

If you answer no to all of the above, get a notepad, dedicated document on your laptop, or invest in some software to start planning ahead and ask yourself the question: when am I most productive?

Before I had a to do list, I had no idea how I knew what was going on! Not only do you get your dopamine hit by ticking something off after completing it, but it can really help you to get more done. By planning what you will be doing in advance, you are setting yourself up for success and you will be able to thank your past self for being so organised.

With good preparation, you can look at big picture items and see how they fit alongside your day-to-day items. Then you can assess if what you want to get done in a week is actually achievable. It’s such a handy tool for a 1-1 as well and helps your manager to make sure you don’t get overwhelmed.

Insights from the experts

Lauren Metcalf, Content & Marketing Coordinator, Salesforce Ben

“Give yourself credit for small wins. Break tasks up so you are giving yourself lots of small ticks instead of waiting for that one big one. I add things to my list that weren’t on there to start with but needed to be done and I’ve completed. It helps me look back at the end of the day with a sense of achievement.”

Paul Harris, Principal Consultant, Coacto

“Plan your day the day before. Do the difficult tasks first. Do it, schedule it, delegate it or bin it.”

Elisa Edmondson, Business Systems Analyst, AMAROK

“I make detailed notes on each project so I can jump back in without reinventing the wheel.”

Will Shinton, Director of Operations, Purus

“Make a list, order it by priority, execute!

Stuart Manning, Apprentice/Consultant, Coacto

“Break tasks into smaller pieces to make them more manageable which stops you feeling overwhelmed, and ensures critical tasks are completed on time. Set realistic goals that are achievable and ensure you reward yourself when tasks or projects are successful. Working as a team and being a team player helps you achieve goals. Finally, take breaks to help prevent burnout and increase productivity.

2. Give yourself space to focus

Setting yourself aside some distraction free time to knuckle down on a task / project is a great way to get a big chunk of work done. You’ll feel productive, motivated, and a great sense of achievement!

This can be achieved with focus blocks. The most important part of these focus blocks is that all distractions are truly gone! Yup, that even means leaving your phone on the other side of the room. The biggest game changer for me has been blocking out my calendar, setting myself on ‘do not disturb’ mode, and enjoying getting into the zone. It’s actually amazing how much you can do in 25 mins with no distractions! Sometimes I’ll set myself 50 mins of time to get a decent chunk of work done and its only taken me 20 mins because I am truly in a state of flow.

Whilst there are tons of different tools and techniques you can use related to focus blocks, once you’ve found what works for you, make sure you are aware of the time of day you are most productive to set aside for these focus blocks. For me, it’s earlier in the morning, but this will be different person to person!

Insights from the experts

Mike Davis, CRO, Invisory

“Embrace the reality that 5-6 hours of focused, 100% dedicated work time is more productive than 8-9 hours of in and out focus. Follow your own productivity timeline of the day and adapt your schedule to meet your needs.”

Jonny Wilson, Software Architect, ProvenWorks “Being able to get my head down, no interruptions or meetings and just get into the flow of the code.”

Eric Dreshfield, Independent Consultant

“Set aside specific blocks of time on your calendar every day to work on specific projects (outside of meeting times) and don’t let anything get in the way of this dedicated time.”

Jon Oliver, Commercial Manager, NC Squared

“Allocating tasks not just by priority, but by the type of attention they need. Some tasks are labourious, but don’t need too much focus so may work best in ‘down’ time; others are interesting but need lots of attention so perhaps best at the start or end of the day just after caffeine!”

David Massey, Founder, Get Force Certified

“Time blocking – Although a really simple concept, I’ve found that time blocking my calendar allows me to stay focused and avoid distractions, it allows me to maximise my working hours so when I finish, I can spend time with my family without feeling guilty for not accomplishing enough. I’ve tweaked how I do it over a number of years, and I think I’ve got to the stage where it’s really effective for me.”

3. Establish your priorities

When speaking to a whole range of people both inside and outside the Salesforce ecosystem, priorities came up the most. You can be the most productive person in the world but if your priorities don’t align with your team or organisation, you might not actually feel like you’re getting anywhere.

Take a step back and look at what your goals are for the quarter ahead, the month ahead, the week ahead and THEN you can look to see what is important daily.

Insights from the experts

Tamsin Foster, Salesforce Administrator, Service Express

“I write a note to myself for tomorrow, saying what to prioritise.”

JP Legget, Founder and CEO, Squivr

“If it is on the calendar it gets priority – in my role the jobs are never done and I wear many hats. Using my time wisely means effectively setting aside time to support each arm of the business.”

Chris Taylor, Principal Consultant, Nebula Consulting

“I organise and prioritise work items. I keep my inbox at zero by snoozing items with a low priority, creating tasks to book things into a time slot that works for me and unsubscribing from stuff I don’t need cluttering my inbox.

Lucy Mazalon, Operations Director, Salesforce Ben

“One post-it note for priorities (my rule is I can’t add more than five at a time).”

4. Be kind to yourself and be vulnerable

I really want to hammer home the point that to help others, you have to help yourself first. You’re never going to be efficient, productive, or happy at work if you’re struggling. Reach out to colleagues if you need help. In the long run, who knows, they might be the one to reach out to you when they need help!

A little note / nudge for managers here about showing your vulnerable side. For years I thought you had to be superhuman to be a manager, never having an off day. But we all get them! Share your failures and struggles with your team, they will realise you too are human! Plus, perfectionism is scary and not many people want to work with perfectionists. Open up to your team, share your struggles along the way, and you will succeed even better together.

Insights from the experts

Ruth Cawdron, Marketing Manager, ProvenWorks

“I’m learning that you don’t have separate energy tanks for work and life, and so I find it helpful to plan ahead how I’ll be kind to myself. Busy weekend? Schedule in some easy administrative work to start your Monday off. Huge work event? Try to block out the next day for follow up. Being kind to your future self is what nurtures a long-term sustainable approach to productivity.”

Ben McCarthy, Managing Director, Salesforce Ben

“I suppose a few things…ensure I use a to-do list to work through, block out time on my calendar to work through specific items, try and minimize unnecessary meetings, ensure I go for a walk in the morning to kick start my brain and body!”

Kuldip Hilyer, Founder and CEO, Kugamon

“Strive to be in the zone, and if you are not, do something, such as go for a drive and get coffee, run an errand. Then get back in the zone. This only works if you enjoy what you do. Otherwise change your job. You are a productivity guru if you enjoy your work. No tool can really help. Tools are only band aid.”

Charlene Johnson, Senior Salesforce Administrator, University of York

“Take your lunchtime away from your desk – go for a walk.”

5. Consider your workspace

Have you ever gone to cook dinner in a messy kitchen? You’ll know that when everything is fresh and tidy, not only will you be more motivated, you’ll find yourself enjoying your work more too!

Do you need to change up your workspace every so often? Every Wednesday morning I make an effort to go and work elsewhere (I work from home 95% of the time) and I’m amazed at how different my mindset is when I change scenery. Often it’s either on a Wednesday morning or when I’m walking my dog that I get some of my lightbulb moments!

Want to know how others in the Salesforce Ecosystem are productive!?

Read some more advice from other people across the Salesforce ecosystem; you’ll start to see some common themes!

Sarah Kelleher, Customer Success Director, Nebula Consulting

“Keeping my inbox tidy is my secret weapon. My unreads act as my to-do list which means I can keep a good eye on what I’ve got on at the moment and prioritise effectively. I know it’s divisive, but it works for me!”

Aaron Poulton, Head of Business Development, Ortoo

“Get uncomfortable! Too often we do the work we like or find easy as opposed to the work that will make a real difference.”

Megan Sadler, Partner Marketing and Alliances Manager, Traction Complete

“I get a lot of satisfaction from crossing things off a list, so getting to do so definitely helps drive me. I like to break up projects into smaller tasks so I can celebrate the smaller victories as well as the large ones.”

Jessie Shedden, Customer Renewals Executive, ProvenWorks

“RADICALLY reducing clutter. My inboxes consistently have less than 10 items (rough figure), my electronic folders are kept clean and fresh too. My singular desire is to do things in the quickest and easiest way with the greatest amount of impact.”

Leon Crisp, Founder and CEO, Ortoo

“Focus, ruthless prioritisation, maximise energy health and mood. Tools – get a good set of tools, learn to use them well, and use the right tools for each job.”

Laura Truman, Marketing Executive, Native Video

“Time manage, set time to tasks (i.e. task x to do at 3pm), and don’t stress about things until they come around. You know that you’ll resolve the problem / task when it arrives.”

Rachel Dance, Business Development Manager, Improved Apps

“Have a list of what needs to be done… Prioritise 3! Collaboration, I find working closely with others promotes creative thinking and encourages problem solving and innovation, but be strict on time and focused on the task in hand. Avoid distractions if you need to focus. Ignore slack and email and get your head down, use ‘do not disturb’. I’m always more productive if there is a time pressure!”

Callum Hurry, Director of Product Engineering, ProvenWorks

“Break tasks down into more manageable pieces of work and don’t be so strict on yourself if it doesn’t get done when you initially planned it to.”


About ProvenWorks

We mean it when we say we’re Salesforce experts. We work exclusively in the Salesforce ecosystem and our products are built 100% for Salesforce.

Address Verification Flow Component: Enable 2 Street Line Address

Prerequisites

  • The AddressTools Flow Component is installed in your organisation, find it here on the AppExchange.
  • The AddressTools Flow Component will need to be in a Screen-Flow before starting the configuration. If you need to add the component to a Screen-Flow, the steps of how to achieve this can be found here.

Enable 2 Street Line Address

  • Navigate to your Salesforce Flow in Salesforce Setup
  • Click the Address Verification by ProvenWorks component that you previously setup.
  • Ensure that Use Second Street Line is set to {!$GlobalConstant.True}.

Once Street line 2 is enabled you can label it to your preference using the Street2 Label field.

Back to the Address Verification Flow Component installation walkthrough

How to: deploy AddressTools Free to users in your organization

Overview

With AddressTools now installed in your Org, it is essential to provide your users with the correct permissions to use the solution.

This article will explain what permissions are required for users to be able to use AddressTools functionality.

It is recommended that a permission set is created for AddressTools so that it can be applied to multiple users/profiles but these settings can be directly applied to the profiles.

Object and Field Permissions

Setup each object and associated fields with the permissions noted in the table below.

Object Object Permission Field Name Field Permission
Users N/A QuickComplete Country Read
Countries View All All fields Read
States View All All fields Read

Apex, Visualforce and Custom Settings

The user/profile will need access to all Apex Classes with the prefix:

  • pw_cc.

The user/profile will need access to the following Visualforce Pages:

  • pw_cc__CountriesJavaScript
  • pw_cc__SessionIdPage

The user/profile will need access to the following Custom Setting Definitions:

  • pw_cc.CountryComplete Settings
  • pw_cc.AddressTools Fields to Validate

License Allocation

After deployment to production, a site licenses is provided.


Back to the AddressTools Free installation walkthrough

AddressTools Free: Install a default country and enable QuickComplete Country

Installing a default country for all users

One of the first steps during the installation walkthrough is ‘Installing a Default Country’. QuickComplete is the specific functionality in the solution that leverages this value to life. If you need to install a default country to all your users, follow the installing a default country article, then come back here when you’re done.

Installing a separate default country for different users

The user records in Salesforce are provided with a new field “QuickCompleteCountry (pw_cc__QuickCompleteCountry__c)” when AddressTools is installed. This field is what stores a text value of the default country for the user for use with QuickComplete Country. Before you can update the field in the user interface, add this field to the User page layout.

  • Navigate to the User record that you want to add a default country to.
  • Select Edit.
  • In the QuickComplete Country field, type the name of the country you want to add.
  • When complete, Save the record.
  • Repeat for any additional users you want to update.

Note: The QuickComplete Country field is a text field that can accept any value, however, you should only write in country names that you have installed in your organization. Failure to match these values may result in validation rules failing.

Enabling QuickComplete Country

  • Go to App Launcher | AddressTools Administration.
  • Select Settings from the sidebar.
  • Click the pencil next to QuickComplete Country Enabled and tick the checkbox.
  • Default country installation will become available once enabled. Use the Default Country Installation picklist to choose the default country for the organization.
  • Use the Save button.


Back to the AddressTools Free installation walkthrough

AddressTools Free: Understanding QuickComplete Country functionality

What is QuickComplete Country?

QuickComplete Country allows you to install a default country for each of your users. The trigger has the ability to auto-populate the country field if it is left null.

Trigger behaviour

When QuickComplete Country is enabled, it has the ability to automatically populate the country field with the default country value without any direct user interaction. This will operate when a change is made to any configured address fields when the country field is left null. If all address fields are left null or untouched, the default country will not be populated into the country field.

Back to the AddressTools Free installation walkthrough