This blog will take you through the key aspects of Education Cloud to provide you with more knowledge on what you can do with Salesforce Education Cloud, Digital Experiences and our Address Verification Flow Component. The second half of this article will walk you through a use case step-by-step that brings together all of this knowledge: creating a screen flow on a digital experience for prospective students to request a prospectus to be sent to their address.
What is Salesforce Education Cloud?
Education Cloud is a platform built on Salesforce CRM aimed at the education sector, from schools through to higher education institutions like universities and colleges. This cloud is aimed at keeping students, alumni and staff connected. According to Salesforce, Education Cloud is intended to “deliver the personalised engagements, proactive advice, and connected experiences students expect”. Education Cloud has a tonne of benefits, specific to the education industry it serves. This purpose-built platform enables educational organisations to better connect students, staff, schools, districts and universities, as well as providing a 360-degree holistic view of the education journey. 💡 Check out our blogpost: ‘What is Salesforce Education Cloud and what can you do with it?’ to learn more about the benefits and use cases of Education Cloud!
Education Cloud meets Digital Experiences
A Digital Experience, also known as a DX, is a digital interaction between the organisation offering the digital experience and other users (students, families, employees, or partners). Salesforce offers Digital Experiences through Experience Cloud, which enables you to build beautifully-branded external-facing sites that are connected to your CRM. Digital Experiences can provide educational institutions with better digital interactions for students and their families:
- Improving the student experience and retention
- Nurturing academic health with student-centric digital experiences,
- Increasing prospective student engagement rates at the top of funnel.
Digital Experiences can really drive success for everyone involved!
Capturing accurate data for your Education Cloud
At ProvenWorks, we believe good data is the basis of success. Data is at the heart of all institutes and it’s critical that data is accurate at point of entry. With this goal in mind, we’ve developed solutions like AddressTools. Whether you’re sending out a prospectus or tracking term-time accommodation, capturing an accurate address is critical for your operations. When addresses are inaccurate or incomplete, 41% of deliveries are delayed, and 39% simply fail. For students, receiving critical post in good time can be the difference between smoothly enrolling into education or anxiously losing grip of future plans. For colleges and universities, tracking student addresses is important for sending mail to the correct address – whether a student is at their home or term-time address. Capturing accurate addresses is essential for education institutions, and what better way than by capturing addresses at point of entry with typeahead address?
Implementing typeahead address entry into an Education Cloud’s Digital Experience
We’ve established the need for capturing accurate data when utilising Education Cloud, so how can we improve this experience for capturing addresses? Using the Address Verification Flow Component by ProvenWorks, you can:
- reduce data entry abandonment,
- mitigate undelivered and returned mail,
- minimise missed opportunities,
- and improve staff productivity by allowing them to focus on what’s important.
So, let’s explore the use case of prospective students requesting a physical prospectus. We want to make this process as easy as possible and ensure that the data we collect is verified.
The use case: a prospective student requesting a prospectus
Let’s explore how we can build a form using a screen flow for prospective students to request a prospectus which will be made public on a Digital Experience. in the following steps, we will:
- Create a Salesforce Flow to create a new Lead and upcoming Activity to send a prospectus.
- Utilise the Address Verification Flow Component by ProvenWorks to provide typeahead address entry to the Flow Screen.
- Deploy the Flow to a Digital Experience.
*Note, this guide will not cover the creation of a Digital Experience but will show how to place your Flow into the DX builder. Salesforce has extensive documentation on how to configure a Digital Experience available here: Experience Cloud (salesforce.com)
Before continuing
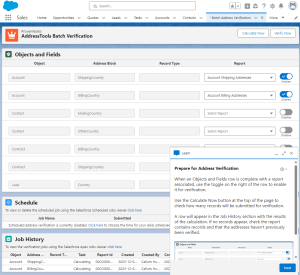
The following steps demonstrate the value of having both AddressTools Premium and the Address Verification Flow Component installed in your Education Cloud org. To follow along with the guide you will be required to install and complete the initial installation steps for both packages, including obtaining address verification credits from the ProvenWorks team. If you don’t yet have these packages installed, don’t fret! You can still read below to understand how to quickly implement typeahead address verification into your Flow Screen and then come back to explorw the managed packages after!
Steps: Flow Creation
- Salesforce
Setup | navigate to your Salesforce Flow
New Flow | Select Screen Flow | Click Create- Add
New Resource | Variable
- API Name we used
ProspectiveLead
- Data Type |
Record
- Object |
Lead
- Select
Save

Add element
- Click the
Add element | Screen
- Drag the following fields onto the Screen:
- First Name
- Last Name
- Email
- Optionally add any additional fields that you need to capture i.e. Mobile Number, but leave out the Address fields for now.
- Navigate back to Components in the panel on the right of the Screen editor.
- Add
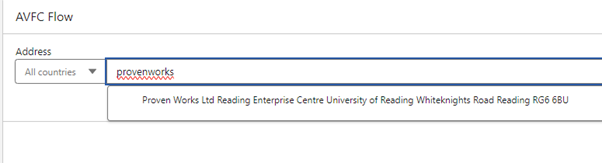
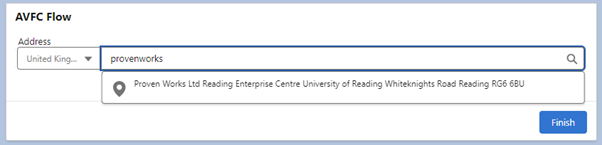
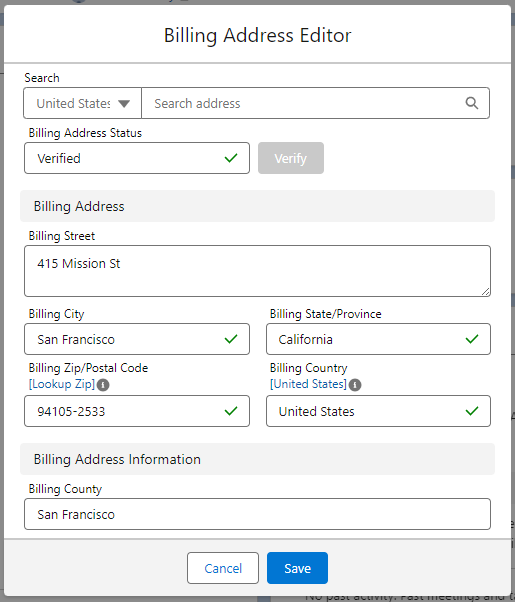
Address Verification by ProvenWorks into the Screen.
- Click on the
Address Verification by ProvenWorks component to open the component parameters on the right of the interface.
- Scroll down the parameters and tick Manually assign variables
- Assign the following Values:
- City Value >
{!ProspectiveLead.City}
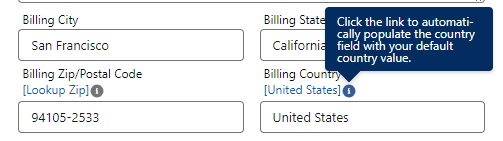
- Country Value >
{!ProspectiveLead.Country}
- Postal Code Value >
{!ProspectiveLead.PostalCode}
- State/Province Value >
{!ProspectiveLead.MailingState}
- Status Value >
{!ProspectiveLead.pw_ccpro__AddressStatus__c}
- Street Value >
{!ProspectiveLead.Street}
- Click
Done

Create the Lead Record
Now that we’ve created a Flow Screen to capture the Lead’s information, we need to insert it to a new Lead record in Salesforce.
- Add
Element | Create records
Label | Create Prospective Lead- API Name will auto populate
- Create a Record from These Values |
Record | ProspectiveLead
- Click
Done

Create an Associated Task
Now that we’ve created a record for the Prospective Lead, we need to create an activity to send the prospectus to the lead.
- Add
Element | Create records
- Object |
Task
- Label |
Create Associated Task
- API Name will autopolulate
- New
Resource | Formula | API Name TomorrowsDate
- Data Type |
Date/Time | Formula {!$Flow.CurrentDateTime+1} Done
- Set Field Values for the Task: • ActivityDate <
TomorrowsDate • Description < Send a prospectus • Status < Not Started • Subject < Send a prospectus • Type < Action Item • WhoId < ProspectiveLead>LeadID

Add a screen to notify the Prospect
It’s good practice to show a completion message after the flow has completed its processes. We’ll do this by adding another screen element at the end of the Flow. Add element
- Click the
Add element | Screen
- Label |
Lead Created Message
- API Name will autopolulate
- Drag display Text and display the message you desire.
- Click
Done

Save the Flow
The Flow now captures Lead information, saves it to a new Lead record, then creates a related task for your internal team to follow up on. Let’s save this Flow so we can use it in our Digital Experience.
- Select
Save
- Provide a Flow Label to help you identify the Flow in the future, i.e.
“Prospectus Request”
- The Flow API Name will be auto populated, change this if required.
- Click
Save
Activate the Flow.

How to expose the Flow in a digital experience
- Salesforce Setup | Open the Digital Experience where you want prospective students to request a prospectus from in the Experience Builder, then navigate to the page that you want to add the Flow to.
- From the Components panel, drag the Flow component onto the page.
- In the property editor, select the relevant Flow.
- When you’re happy with the Digital Experience, press Publish.

Summary
We have now created a way for prospective students to easily request a prospectus via a Digital Experience, and most importantly to gather accurate address data in a fast an efficient manner. 
AddressTools
AddressTools is our award-winning package for Salesforce to help you standardise, validate and verify your address data.