Standardisation will need to be enabled in global settings:
Navigate to App Launcher | AddressTools Free Administration.
From the sidebar, navigate to Settings.
Tick to Standardisation Enabled.
Enable state standardization for an address block
Now that the desired state format has been configured for each country, head to the address blocks section to enable the state standardization for listed address blocks.
Navigate to App Launcher | AddressTools Free Administration.
From the sidebar, navigate to Address Blocks.
Select Edit next to the address block you want to modify.
Standardization is the process of converting multiple known values to a single predetermined format. For example, “USA”, “US”, and “United States of America” can each be standardized to “United States”.
The same behaviour can also be applied to states. For example, “TX” can be standardized to “Texas”. Standardization is a crucial piece of functionality for organizations running reports on country and state data, or relying on duplicate rules where these field values are compared.
What address fields can be standardized in AddressTools?
Standardization is available for the following fields:
Country
State
What formats are acceptable for country standardization?
There is one format available for country standardization, an example for Egypt is provided below:
Full name – Egypt
This data is stored on the Countries object installed with the package.
What formats are acceptable for state standardization?
There is one format available for state standardization, an example for Texas is provided below:
Once all validation rules have been configured for each address block with country-specific settings specified, the validation functionality needs to be enabled for the organization. In the event that you want to disable all configured validation rules, the following setting can be disabled.
Go to App Launcher | AddressTools Free Administration.
Select Settingsfrom the sidebar.
Click the pencil next to Validation Enabled.
Tick the Validation Enabled box to enable validation.
Click Save.
Testing a validation rule
With validation rules configured and enabled for an address block, it’s great to test the changes to see if everything is working as expected.
Navigate to a record in Salesforce on the object you have configured.
Edit the address block to breach a configured validation rule.
Attempt to save the record.
If everything is configured correctly, your validation rules will prevent the record from saving and provide an alert for what needs to be rectified. After rectifying the data, the record will then save.
AddressTools allows you to configure some of its validation rules on a per-country basis.
Example:
United States
Allow Only Listed States = TRUE
State Mandatory = TRUE
China
Allow Only Listed States = FALSE
State Mandatory = TRUE
This above example can be seen in the screenshot below.
Country-specific validation rules are essential when certain elements of address data are required for different countries. These types of restrictions are particularly popular to avoid integration nightmares when data is pushed out to different systems.
Configuring the country-specific settings
To configure country-specific validation rules:
Go to App Launcher | AddressTools Free Administration.
Navigate to Country Specific Settings on the sidebar.
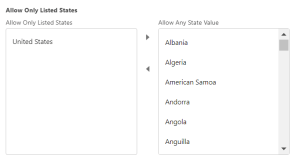
Configure the Multi-Select Picklists to your requirements by selecting a country in the relevant list and selecting the horizontal arrow to move it from one list to the other.
Once all items have been adjusted, select Save.
Note: despite a value existing in one of the enforced lists, the setting will not be enabled until it is checked in the address block configuration, followed by checking Validation Enabled in the settings tab. This will be covered in the following articles.
Before we get started, address validation and address verification are often thought to be the same thing, but within AddressTools, they are two separate pieces of functionality. Let’s take a closer look at both so you can work on implementing the right features for your organization.
What is address validation?
Address validation provides validation rules to the configured address blocks in Salesforce. For example, make fields mandatory, limit field entry to only acceptable values, and enforce regular expressions for fields like Zip/postal code. Validation rules are great for ensuring that data meets organizational requirements, simplifying reporting, minimizing dirty data, and it can be essential to reduce integration syncing headaches.
What is address verification? (Only available though AddressTools Premium)
Address verification leverages external data points such as USPS, Royal Mail and Canada Post to verify the deliverability of an address. There are interactive real-time and automated/batch options available to verify address data with AddressTools. To find out more about address verification in AddressTools, check out the Understanding address verification in AddressTools article.
What address validation rules are available in AddressTools?
See a full list of validation rules available in AddressTools below:
With the object’s trigger created or confirmed that one already exists, we now need to create an address block configuration.
An address block configuration identifies address fields on an object that we’ll want to enable AddressTools functionality onto. It also provides settings specific to that address block which can be enabled/disabled at a later stage such as making fields mandatory, or enabling standardization.
Let’s take a look at all the parts that go into an address block configuration:
Object– the object where the address fields exists.
Postal Address Fields – street, city, state, ZIP/postal code and country field.
Global Settings – enablement for international validation rules and standardization.
Country Specific Settings – enablement for country specific validation rules.
As you can see, there are a lot of pieces that go into an address block configuration. However, certain settings can be skipped depending on your implementation.
This article will cover binding the object, record type, and postal address fields with AddressTools. The additional items will be covered in the specific articles related to enabling their features.
Note: after initial data installation has occurred, Accounts (billing address, shipping address, person mailing address and person other address), Contacts (mailing address and other address), Leads (address) and Contract (billing address and shipping address) will already be configured with settings ready to customize.
Binding a new address block
Go to App Launcher | AddressTools Administration.
Select Address Blocks from the sidebar.
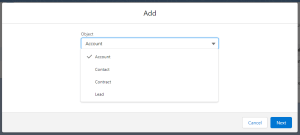
Click Add in the top right corner.
Choose the Objectwhere the address fields exist.
Select Next.
Note: The configured functionality will apply to all record types for the object if record types are enabled for the object.
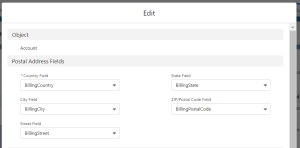
Within the Postal Address Fields section:
Under *Country Field, use the picklist to reveal the object’s available fields.
Find and select the country field’s API Name.
Under State Field, use the picklist to reveal the object’s available fields.
Find and select the state field’s API Name.
Under City Field, use the picklist to reveal the object’s available fields.
Find and select the city field’s API Name.
Under ZIP/Postal Code Field, use the picklist to reveal the object’s available fields.
Find and select the ZIP/postal code field’s API Name.
Under Street Field, use the picklist to reveal the object’s available fields.
Find and select the street field’s API Name.
Once every field has been configured within the Postal Address Fields section, click Save.
With the postal address fields now bound to an address block configuration, continue through the installation walkthrough and use the relevant setup articles for the functionality you require. The specific articles will walk you through the rest of the address block modal options as you require them, teaching you along the way.
Note: if you cannot find a field you are looking for in any of the picklists, this indicates that the field may already bound in an existing address block configuration for the same object, or you do not have permissions to view the field. First, check to see if the address block is already configured in AddressTools. If not, check the field level security of the fields in question.
AddressTools has a number of features that operate during the record insert and update operations into Salesforce. This includes (but is not limited to) enforcing validation rules, updating verification statuses, standardizing fields, and populating lookup fields.
A trigger is required on the objects that contain address fields that are configured with AddressTools. Without the trigger, most functionality will not fire and other functionality may appear to not behave as intended.
What triggers are already provided with the package?
The following objects already have a trigger provided with the package. This means you don’t need to create them:
Account
Contact
Contract
Lead
If you only plan to use AddressTools exclusively on the objects noted above, you can move on to the next article.
How can I disable the triggers provided with AddressTools?
In the event that you need to disable the triggers provided with the package, or you do not plan to use AddressTools functionality on some of the preconfigured objects:
Go to AddressTools Administration | Settings.
Scroll toTrigger Setting where you will find:
Enable Account Trigger
Enable Contact Trigger
Enable Contract Trigger
Enable Lead Trigger
Use the pencil icon next to the appropriate setting and uncheck the field.
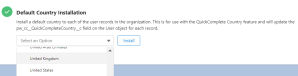
To use QuickComplete Country functionality, you are required to install a default country. This populates the custom field pw_cc__QuickCompleteCountry__c on the User object for all users in the organization.
You can find out more about the QuickComplete by reading the article here. This is covered later in the installation walkthrough.
To install a default country:
Go to App Launcher | AddressTools Free Administration.
Use the picklist and select a Country under Default Country Installation.
If the picklist is empty, you may need to refresh the page after completing a data installation.
Select Install.
A process will begin in the background to populate the records in the organization. The time taken will vary in relation to how many users are in your organization.
To provide the best experiences, we use technologies like cookies to store and/or access device information. Consenting to these technologies will allow us to process data such as browsing behavior or unique IDs on this site. Not consenting or withdrawing consent, may adversely affect certain features and functions.
Functional
Always active
The technical storage or access is strictly necessary for the legitimate purpose of enabling the use of a specific service explicitly requested by the subscriber or user, or for the sole purpose of carrying out the transmission of a communication over an electronic communications network.
Preferences
The technical storage or access is necessary for the legitimate purpose of storing preferences that are not requested by the subscriber or user.
Statistics
The technical storage or access that is used exclusively for statistical purposes.The technical storage or access that is used exclusively for anonymous statistical purposes. Without a subpoena, voluntary compliance on the part of your Internet Service Provider, or additional records from a third party, information stored or retrieved for this purpose alone cannot usually be used to identify you.
Marketing
The technical storage or access is required to create user profiles to send advertising, or to track the user on a website or across several websites for similar marketing purposes.