AddressTools v10 introduces new data points that expand the address data available within Salesforce®. This release enriches records with deeper geographical context through new capabilities like ‘Geolocation’ and ‘Property Use’ values, alongside improvements to international address handling, the user experience for duplicate detection, and updated package security.
Here is what we will cover:
- Geolocations with verified address data
- Property Use for verified addresses
- Streamlining state and province data for international addresses
- Addition of ISO Currency Code to each country record
- Alignment of duplicate detection with the Salesforce experience
- Updated security and permission sets (important breaking change note)
- API version 66.0 updates
- How to upgrade
- How to get access to geolocation functionality
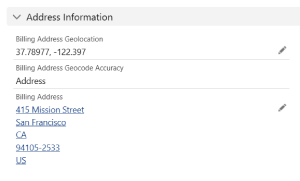
Geolocations with verified address data
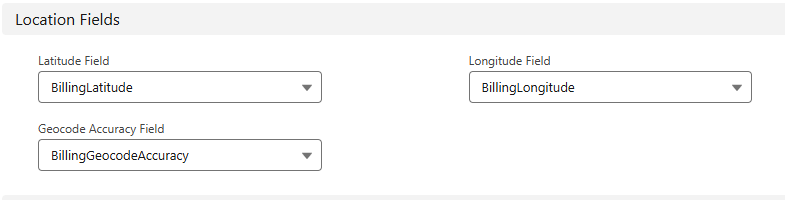
AddressTools v10 introduces geolocations as an add-on feature, giving you latitude and longitude directly alongside your verified address data. When an address is verified, AddressTools can now return geolocation coordinates, making it easier to power mapping, territory planning, proximity searches, and location-based automations in Salesforce.
Example uses include:
- Plotting accounts and leads on maps for your sales teams.
- Driving “nearest store/office” lookups based on a contact’s location.
- Enabling service routing and dispatch based on real distances rather than just ZIP or postcode.
Geolocation is available as a separately licensed capability. Find information at the end of the article on how to try out geolocations.
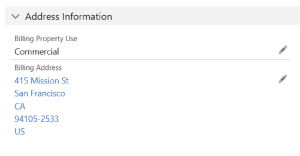
Introducing ‘Property Use’ to identify residential and commercial addresses
AddressTools 10.0 introduces the Property Use field, a new data point that is automatically populated when an address is verified. This field classifies the property at a given address as Residential, Commercial, or Unknown, giving you richer context about the addresses in your Salesforce org.
Example uses include:
- Segmenting accounts or leads by property type for targeted sales or marketing campaigns.
- Routing service cases differently based on whether the property is a residential or a commercial premises.
- Improving data quality checks by flagging unexpected property types, such as a B2B account registered at a residential address.
Property Use data is available for addresses in the following countries: United States, United Kingdom, Canada, Australia, Belgium, and the Netherlands. For addresses outside of these six countries, the Property Use field will return Unknown.
Property Use is included with verification in AddressTools Premium 10.0 at no additional cost. The field populates automatically during the standard verification process, alongside your existing address data once the field has been created and mapped in your address block.
Streamlining state and province data for international addresses
AddressTools v10 introduces updated logic for handling administrative areas in countries where a state or province is not required for mailing purposes. In previous versions, certain addresses might return a duplicated value in both the City and State/Province fields. This update ensures that if a country does not require a state for a valid address, the field will remain null to prevent redundant data entry and improve overall record clarity.
An example of this change in action:
- Previous Behaviour: An address in Sheffield would return Sheffield as the City and Sheffield as the State.
- New Behaviour: The tool identifies that a State/Province is not required for a GB mailing address. It will return Sheffield as the City and leave the State/Province field null.
- This refinement provides several benefits:
- Cleaner Data: Eliminates redundant or unnecessary geographical data in your Salesforce org.
- Mailing Accuracy: Ensures custom address labels and digital exports follow the specific postal standards of the destination country.
- Improved Reporting: Prevents “State” reports from being cluttered with duplicate data for countries that do not utilise that hierarchy.
This update to address verification logic is a service-level change. As a result, it will affect all versions of AddressTools currently in use, ensuring consistent data handling across your entire environment.
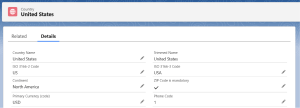
Currency ISO Codes for each country
AddressTools v10 now includes Currency ISO values for every country record provided with the product. Each country entry now lists its official three-letter ISO 4217 currency code. For example: “USD” for the United States, “GBP” for the United Kingdom, and “EUR” for countries using the Euro.
This enhancement makes it easier to:
- Align address and country data with financial or pricing systems that rely on ISO-standard currency codes.
- Power quoting workflows that select the appropriate currency directly from a record’s country.
- Provide consistent currency references for reporting and automation.
The new currency field is populated during the data installation stage of setup. For existing implementations, you will need to upgrade your package to v10, then navigate to the AddressTools Administration page and run Update Data.
Alignment of duplicate detection with the Salesforce experience
AddressTools includes an override component that replaces the standard Salesforce new record modal, providing interactive address verification at the point of entry. In AddressTools v10, we have updated the override component so that duplicate detection now aligns closely with Salesforce’s standard new record behaviour.
You can expect:
- Duplicate alerts that appear in the same style and context as native Salesforce.
- A smoother experience for users who switch between the override and standard new record screens.
- Consistency in how duplicates are identified and presented to the users, reducing confusion and improving user experience.
No configuration changes are required. The enhanced duplicate behaviour is included automatically with the updated override component in AddressTools Premium v10.

Updated permission sets and security (important)
We have updated our permission model so AddressTools runs some of the core functionality in system mode, ensuring our code can always access the managed package objects it needs without overprovisioning your users.
What this means:
- AddressTools logic now runs with appropriate system-level access to its own objects.
- You should no longer rely on AddressTools packaged permission sets to grant users access to AddressTools objects (see important note below).
- Instead, we recommend explicitly granting object-level and field-level access via your own permission sets and profiles, aligned with your security model.
Important: If your org currently depends on the packaged permission sets to provide access to AddressTools objects, you may see breakages or access errors after upgrading.
Before upgrading in production:
- Review if users rely on the AddressTools packaged permission sets to gain access to fields on the packaged objects outside of what AddressTools functionality requires.
- If yes, create or adjust your own permission sets to grant the required access to objects and fields used by those users.
- Test these changes in a sandbox with the 10.0 package installed.
API version 66.0 updates
All AddressTools Apex classes and components have been updated to API version 66.0, aligning AddressTools Premium with the latest Salesforce platform capabilities. This helps ensure compatibility with recent Salesforce releases and positions you for future platform enhancements without needing to worry about legacy API behaviour.
How to upgrade to AddressTools Premium v.10:
To access these latest features, you simply need to upgrade the managed package from the Salesforce AppExchange.
Visit AddressTools on the AppExchange
Need more help? We have a handy guide which will walk you through best practice when upgrading packages.
I want to try verification with geolocation data, what should I do?
Unlock the full potential of verified addresses by adding geolocation data to your records. Whether used to optimise service routes or improve your territory planning, we are ready to help get you started. Get in contact with your ProvenWorks account manager or contact us now to discuss enablement and pricing.