Blog

AddressTools Premium: Purchase a new subscription

Understanding the user license pricing

Great! You’re ready to make a start with your new subscription for AddressTools Premium and join our many happy users in solving bad address data! The pricing structure is modular and can be built to your requirement.

The license pricing is broken into two categories:

  • Internal User Licenses – for internal user access to the solution.
  • Community User Licenses – for digital experience (community) user access to the solution.

You can find our pricing guide here.

Note: We offer license discounts for not-for-profits and customized pricing for Digital Experience (Community) use cases. Please contact sales@provenworks.com for a custom quote.

Request a quote for AddressTools licenses

We appreciate that you may want to talk to someone before making a purchase, or you have a purchasing requirement that isn’t covered In-App. Well, we have a wonderful team at ProvenWorks who will be happy to speak with you about your new subscription and help you get invoiced nice and quick.

Specifically, if you would like to do any of the following:

  • Pay by wire transfer.
  • Add a Purchase Order Number to an invoice.
  • Request Not-For-Profit discount.
  • Purchase Digital Experience (Community) users.

…or simply put, you would prefer to deal with a human, you will need to send an email to sales@provenworks.com listing the items you’d like to purchase. A member of the sales team will get back to you to discuss your requirement in detail and provide you with a custom quote for your approval. Once signed-off, you will receive an invoice to be paid.

How to buy user licenses In-App (Internal users only)

So you want to start your subscription without speaking with us? That’s okay! Go you! You are able to buy internal user licenses by credit card In-App.

Note: A payment handling fee of 8% is added to any purchase made with a credit card. For payment via wire transfer, or if you require a custom quote, refer to the request a quote section.

  • Go to AddressTools Administration | Licensing & Credits.
  • Under User Licenses, select Quote.
  • For the first 10 licenses:
    • Under Base, select Buy to add it to your basket.
  • For additional licenses (11+):
    • Under Additional licenses, type the quantity.
    • Select Buy to add them to your basket.
  • You will be redirected to your MyCommerce basket.
  • Enter your Billing Information.
  • Enter your Payment Information.
  • For us to associate your purchase with your Salesforce environment, enter your Salesforce Organization ID under the specified field in Additional Ordering Information.
  • Select Buy Now.

Note: When the order has been received, a member of the team will reach out to ensure you’re up and running. If you need to check any information in relation to your subscription, you can always contact info@provenworks.com stating your organization ID.


Back to the AddressTools Premium installation walkthrough

AddressTools Premium: First-time data installation

What’s installed during data installation?

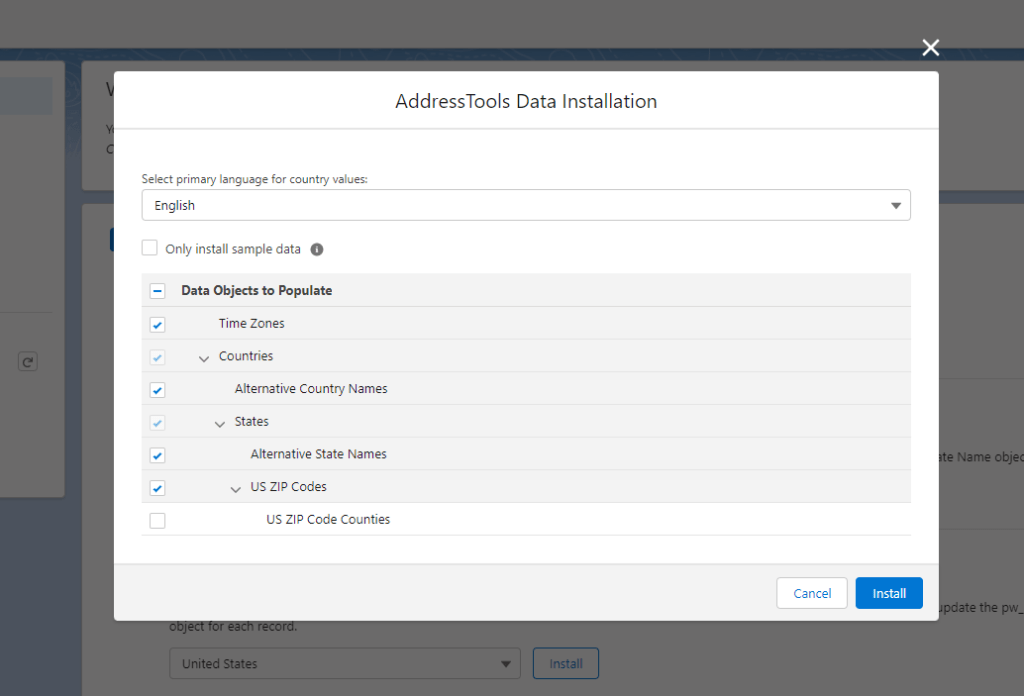
When data installation is run, you have the option to install data to the following custom objects that are installed with the AddressTools package:

  • Countries (mandatory)
  • States (mandatory)
  • ZIP Codes (US only)
  • ZIP Code Counties (US only)
  • Time Zones
  • Alternative Country Names
  • Alternative State Names

The data installed into these objects acts as the backbone for AddressTools’ standardization and validation rules, and can also be customized to meet your business needs.

Furthermore, during the initial run of data installation, the following address blocks are configured within AddressTools to quick start your implementation:

  • Account - Billing Address
  • Account - Shipping Address
  • Contact - Mailing Address
  • Contact - Other Address
  • Contract - Billing Address
  • Contract - Shipping Address
  • Lead - Address

How to run data installation for the first time

Warning – before running the data installation, check your organisation’s storage limit. This can be seen at a glance in the Overview panel in the AddressTools Administration tab. There’s a lot of data to install so ensure you’re not going to exceed it. This can be common in a sandbox or developer org.

To get started:

  • Go to App Launcher | AddressTools Administration.
  • Use the Get Started button under Data Installation.
  • Select a Language.
  • If you’re using a sandbox, it is recommended to check the Only install sample data setting.
  • Select the Data Objects to Populate using the checkboxes.
  • Select Install.
  • Read the warning and then Yes when ready.

The full data installation process can take a while, so now might be a good time to grab a coffee and read through the “Understanding” articles available in the rest of the installation walkthrough.


Back to the AddressTools Premium installation walkthrough

AddressTools Premium: Purchase additional licenses

How to purchase additional seats for AddressTools

Loving AddressTools and looking to expand your user count? Great! Our Customer Success team are on hand to help you grow and continue busting bad address data!

If you know who your ProvenWorks Account Manager is, send them an email noting how many additional seats you’d like to purchase. We can apply the seats right away and worry about the payment afterwards.

Depending on the value of the purchase, we will either invoice you right away, or add it to your next renewal. All additional users will be charged pro-rate to align with your existing renewal date.

Don’t know who your ProvenWorks Account Manager is? Send an email to support@provenworks.com and our support team will be happy to put you in contact with the right person!


Back to the AddressTools Premium installation walkthrough

AddressTools Premium: Understanding the AddressTools Override Lightning Component

What is the AddressTools Override?

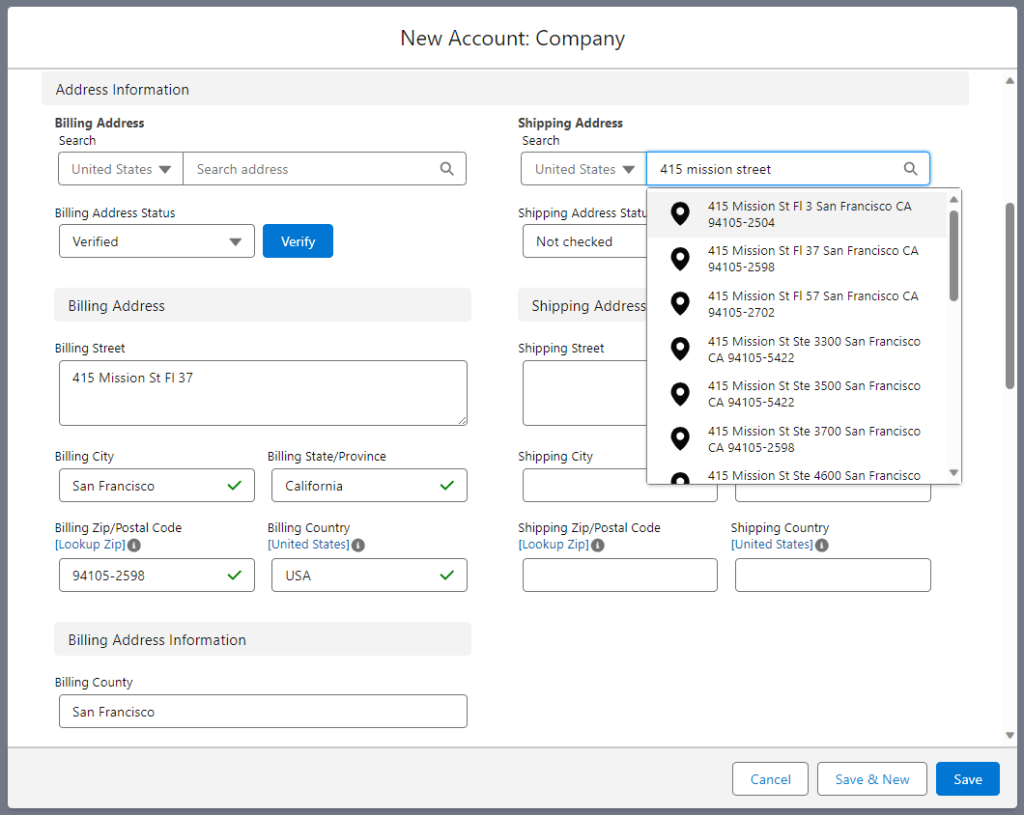
The AddressTools Override component is an advanced lightning component built to replace the standard “New Record” popup that your users experience when creating a new record in Salesforce.

The component is designed to emulate the standard lightning experience so is native to the user. It is also capable of reading your existing page layouts and assignments so there is no additional maintenance work required as an administrator.


What functionality can I access when using the AddressTools Override?

The AddressTools Override lightning component gives you access to the following features at the point of record entry.

  • Type-ahead PowerSearch address verification
  • ZIP Code Lookup
  • Country and State suggestion picklists
  • QuickComplete Country default country selection

Are there any limitations when using the AddressTools Override?

Yes – whilst the component is suitable for most use-cases, the following items are not supported and should be considered.

  • Creating a record from a related list where the new object is overridden will not automatically populate the lookup field.
  • Creating a new record via a lookup field will not use the override component.
  • Different duplicate detection prompts will be shown when duplicate rules are enabled.
  • Dependant picklists on the page layout are not supported.
  • Please also see Salesforce’s Considerations for Overriding Standard Buttons and test thoroughly before deploying to production.

Do I need to use the AddressTools Override?

If you would like the ability to have additional interactive functionality at the point of record entry (such as type-ahead PowerSearch address verification and ZIP Code Lookup), you are required to use the AddressTools Override. If you do not plan to use these features at point of entry, there is no requirement to override the new button with the AddressTools Override.


Back to the AddressTools Premium installation walkthrough

AddressTools Premium: Understanding the AddressTools Record Page Component

What is the AddressTools Record Page Component?

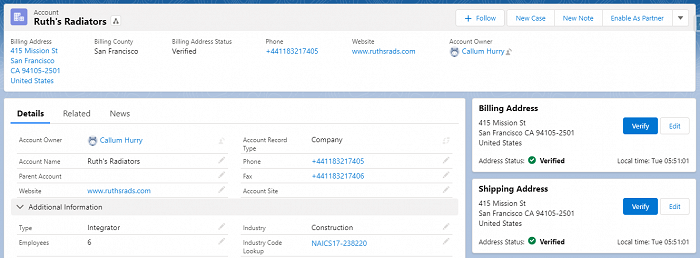
The AddressTools Record Page Component is your one-stop widget for handling anything address related on a record. Quickly verify an address, check the local time, or make some quick changes optimized with additional interactive functionality.

The component is designed to sit on a lightning record page where an address block exists giving your users quick access to everything they need without distraction.


What functionality can I access when using the AddressTools Record Page Component?

The AddressTools Record Page lightning component gives you access to the following features at the point of record entry:

  • Quick address edit
  • Local time
  • Type-ahead PowerSearch address verification
  • Address status
  • ZIP Code Lookup
  • Country and State suggestion picklists
  • QuickComplete Country default country selection

Are there any limitations when using the AddressTools Record Page Component?

None – this component is designed to build on top of your existing lightning record pages and provide your users with a quick widget to handle everything address related on the record.

Do I need to use the AddressTools Record Page Component?

AddressTools’ interactive functionality cannot be implemented on the standard detail component that Salesforce provide in Lightning so we recommend using this component whenever you require editing an address for an existing record. It is also essential that for any interactive functionality such as type-ahead PowerSearch address verification, this component must be used.

As there are no negatives to using the component, there’s no harm in popping it in your Lightning Record Pages for your users to enjoy and once they are familiar with how to interact with it, it can save them loads of time!


Back to the AddressTools Premium installation walkthrough

AddressTools Premium: Understanding QuickComplete Country functionality

What is QuickComplete Country?

QuickComplete Country allows you to install a default country for each of your users. When using interactive functionality in AddressTools, the default country will appear as a quick link next to the country field so your users can click it to pre-fill the value. If you are not using interactive functionality, the trigger has the ability to auto-populate the country field if it is left null.

Trigger behaviour

When QuickComplete Country is enabled, it has the ability to automatically populate the country field with the default country value without any direct user interaction. This will operate when a change is made to any configured address fields when the country field is left null. If all address fields are left null or untouched, the default country will not be populated into the country field.

Interactive behaviour

When using either the Lightning Record Page component or the AddressTools override, a link will become visible next to the country field allowing the user to select the default country which will then populate the country field.

QuickComplete and ZIP Code Lookup

By installing United States as the default country, ZIP Code Lookup will automatically execute when a valid 5 digit US ZIP Code is entered into the Zip/Postal Code field, even if United States is not entered into the Country field.

Back to the AddressTools Premium installation walkthrough

AddressTools Premium: Understanding Lookup ZIP functionality

What is Lookup ZIP functionality?

The Lookup ZIP functionality in AddressTools is an interactive method for Salesforce users to automatically populate the US city and state based on ZIP code, and visually verify these values. ZIP codes relate to US post offices branches, and can span multiple cities depending on population density.

How does Lookup ZIP work for users?

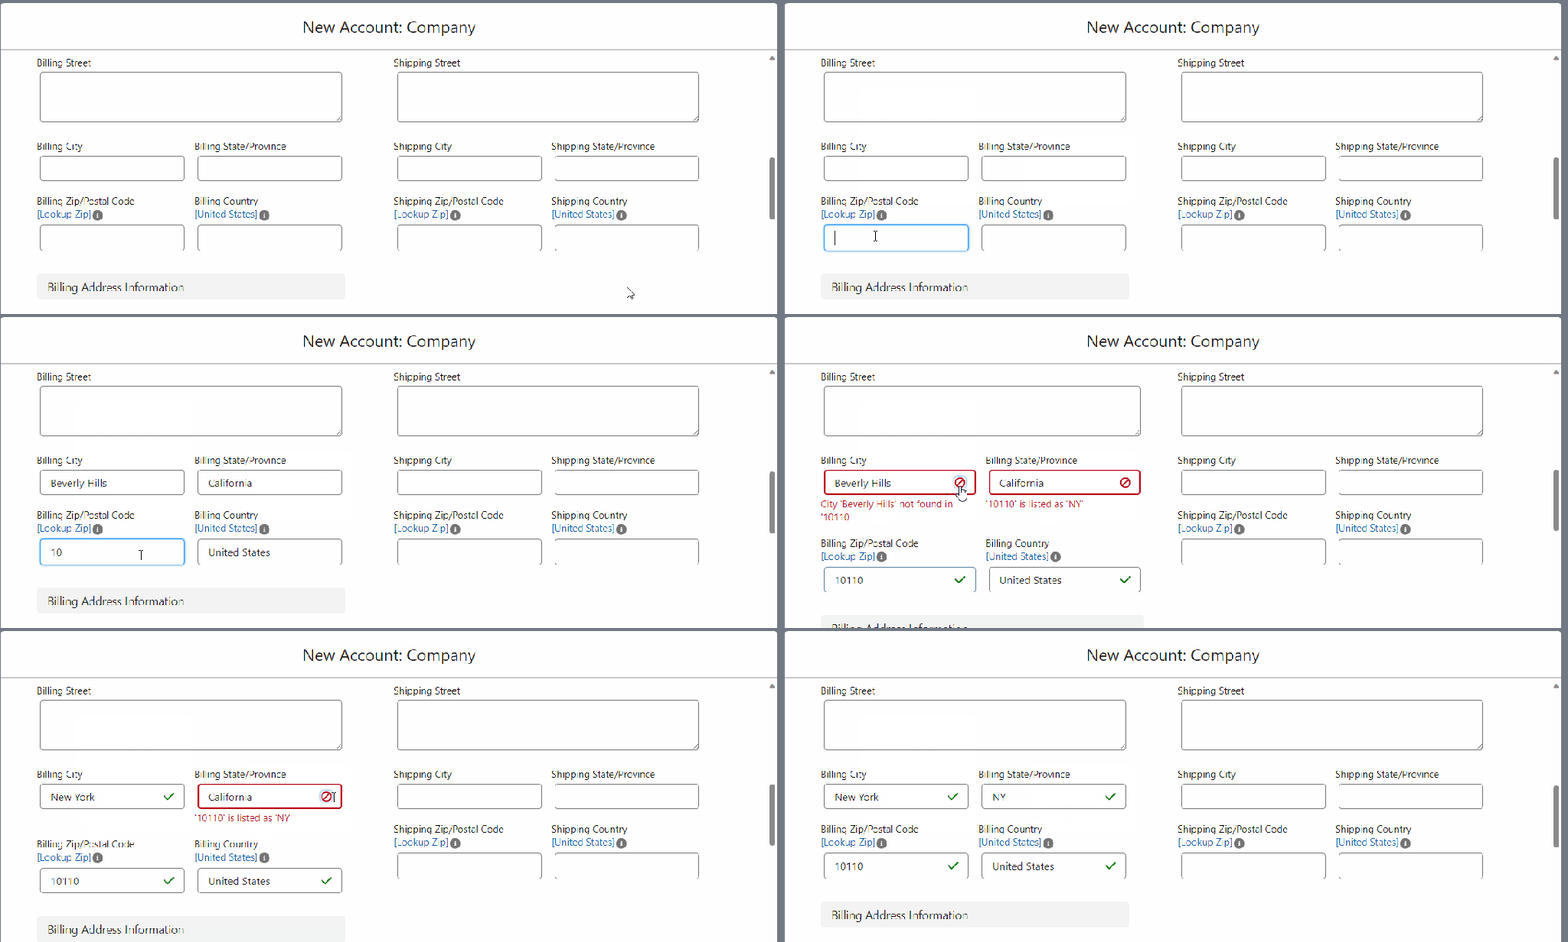
When a user inputs a valid 5 digit ZIP code, Lookup ZIP will automatically populate the state, and either populate the city if there is a single value available, or present a picklist of valid cities. As the US is not the only country that uses 5 digit post codes, you can have the solution assume the user is inputting a US address by specifying the QuickComplete Country for the user, or the user can input ‘United States’ in the Country field.

The user will also get a visual notification, with a green tick, or a red ‘x’, indicating whether or not the City, State and ZIP are a valid combination.

The functionality will automatically fire when the user enters the fifth digit of the ZIP, but for existing records, the “Lookup ZIP” link can be used to engage the functionality to populate city and state.

How is the ZIP data managed?

All ZIP, city and state data is included with the AddressTools package in the Country, State and ZIP Codes objects. This data is populated during the data installation stage of the setup, and can be updated with our latest dataset by navigating to the AddressTools Administration | Installation tab.


Back to the AddressTools Premium installation walkthrough

AddressTools Premium: Understanding lookup field functionality in AddressTools

What are lookup fields?

If you’re unfamiliar with lookup fields, Salesforce describes them perfectly in the following statement:

“Lookup fields allow you to associate two records together in a relationship. For example, a contact record includes an account lookup field that associates the contact with its account”. -Salesforce

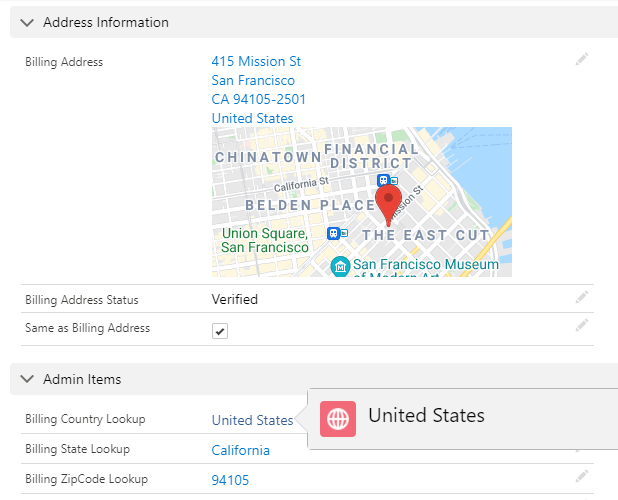
Using the logic above, we allow you to link a record’s country, state and ZIP Code values to the Country, State, and ZIP Code objects installed with AddressTools.


Why is using a lookup field for my address block useful?

Using native Salesforce functionality, you can store additional data on the regional records installed with AddressTools, or leverage additional data points that are installed with the package.

For example, you may have country standardization configured to standardize to the full name on the account, but you can lookup the associated country record and also fetch the ISO-2 and ISO-3 value. These data points can be extremely helpful for integrations. Or why not fetch the primary county value from a US ZIP code to help with territory management?


Back to the AddressTools Premium installation walkthrough

AddressTools Premium: Add the AddressTools Record Page Component to a Lightning Record Page

How to add the AddressTools Record Page Component to your organization

To add the AddressTools Record Page Component to a lightning record page:

  • Navigate to Setup | Object Manager | [Object] | Lightning Record Pages.
  • Select New or if a Lightning Record Page already exists, select Edit.
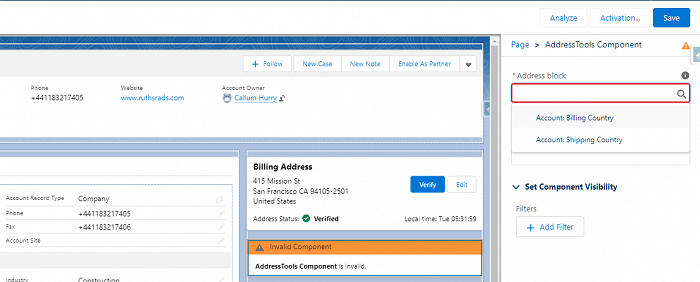
  • Drag the AddressTools Component from the components list onto the layout.
  • Choose the Address block.
  • Optionally, type into the Component header title to add a custom title.
  • Select Save.

If the page has not yet been activated, a prompt will appear asking you to activate it. Follow the steps below to assign the page in the organization.

  • Select Activate.

The page can be assigned based on different levels. For this example, we will set the Org Default by pressing Assign as Org Default.

  • Review the page assignment changes.
  • Select Save.
  • Press Back to exit the App Builder page.

Back to the AddressTools Premium installation walkthrough

AddressTools Premium: Turn on ZIP Code Lookup functionality

Enabling ZIP Code Lookup functionality for the organization

Enabling this setting will provide a Lookup ZIP button next to postal code fields when using either the AddressTools override or the Lightning Record Page component. In the event that you want to disable ZIP Code Lookup functionality for all users, the following setting can be disabled.

  • Open the AddressTools Administration page in your org.
  • In the Administration interface, look for the ‘Settings’ tab on the left-hand side menu.
  • Click on the ‘Settings’ tab to expand the options.
  • You will be presented with a series of settings in the central panel of your screen, under the ‘Feature Enablement’ section.
  • Among the listed features, locate the ‘Enable ZIP Code Lookup’ option.
  • Click on this pencil button and check the ZIP Code Lookup checkbox.
  • After you have checked the checkbox, make sure to click the ‘Save’ button at the bottom of the settings pane to apply and save your changes.

Back to the AddressTools Premium installation walkthrough